
运维服务
docker离线安装
一、准备工作:确认架构并下载安装包 1.1 确认目标服务器架构 在目标服务器上执行以下命令,确认系统架构: 输出 x8664:对应 amd64 架构(Intel/AMD 64位服务
[root@www.wulaoer.org ~]# cat yaml/httpd.yaml

---
- hosts: control-node    # 将要执行任务的主机,已经在hosts文件中定义好了,可是单个主机或主机组
  remote_user: root      # 在目标主机上执行任务时的用户身份
  vars:
    - pkg: httpd
  tasks:
    - name: "install httpd package."
      yum: name={{ pkg }}  state=installed
    - name: "copy httpd configure file to remote host."
      copy: src=/root/conf/httpd.conf dest=/etc/httpd/conf/httpd.conf
      notify: restart httpd     # 当这个任务执行状态发生改变时,触发handlers执行.
    - name: "boot httpd service."
      service: name=httpd state=started
  handlers:      # handlers与tasks是同一级别
    - name: restart httpd
      service: name=httpd state=restarted
连续的项目(即列表)用 -减号来表示,key/value(字典)用冒号:分隔。
playbook语法有如下特性:
[root@www.wulaoer.org ~]# ansible-playbook yaml/httpd.yaml

PLAY [control-node] ********************************************************************************************************

TASK [Gathering Facts] *****************************************************************************************************
ok: [openstack-control2]
ok: [openstack-control1]
TASK [install httpd package.] **********************************************************************************************
changed: [openstack-control2]
changed: [openstack-control1]
TASK [copy httpd configure file to remote host.] ***************************************************************************
changed: [openstack-control1]
changed: [openstack-control2]

TASK [boot httpd service.] *************************************************************************************************
changed: [openstack-control2]
changed: [openstack-control1]
PLAY RECAP *****************************************************************************************************************
openstack-control1         : ok=4    changed=3    unreachable=0    failed=0
openstack-control2         : ok=4    changed=3    unreachable=0    failed=0
[root@www.wulaoer.org ~]# cat yaml/vars.yaml
---
- hosts: compute-node
  remote_user: root
  vars:
    pkg: httpd        # 定义变量
  tasks:
    - name: install httpd service
      yum: name={{ pkg }} state=installed     # 引用变量
playbook中用vars关键字声明变量,变量定义 变量名: 变量值
变量引用 :{{ 变量名 }}
2.2 引用外部变量
在命令行使用--extra-vars参数赋值变量;
[root@www.wulaoer.org ~]# cat yaml/extra_vars.yaml
---
- hosts: control-node
  remote_user: root
  tasks:
    - name: create a file
      file:
        path: /tmp/{{ filename }}    # 引用外部变量
        mode: 0644
        state: touch
命令行使用--extra_vars传入变量:
[root@www.wulaoer.org ~]# ansible-playbook yaml/extra_vars.yaml --extra-vars "filename=temp.txt"--extra_vars "变量名=变量值" 2.3 资产清单(inventory)中定义的变量 也就是在/etc/ansible/hosts文件中定义的变量;
[root@www.wulaoer.org ~]# cat /etc/ansible/hosts
[load-node]
openstack-load1
openstack-load2

[compute-node]
openstack-compute1 ansible_ssh_host=10.0.1.10 ansible_ssh_port=2002 ansible_ssh_user=stanley ansible_ssh_pass=etyfhzmweadf
openstack-compute2

[control-node]
openstack-control1 filename=control1.txt    # 主机变量
openstack-control2 filename=control2.txt

[openstack:children]
load-node
compute-node
control-node

[openstack:vars]
issue="Hello, World"    # 组变量
注意:组变量定义时,不要落下关键字vars,[组名:vars]。 在playbook中引用{{ 变量名 }}即可。 ansible内置了一些固定的主机变量名,在inventory中定义其值,如下:
ansible_ssh_host
      将要连接的远程主机名.与你想要设定的主机的别名不同的话,可通过此变量设置.

ansible_ssh_port
      ssh端口号.如果不是默认的端口号,通过此变量设置.

ansible_ssh_user
      默认的 ssh 用户名

ansible_ssh_pass
      ssh 密码(这种方式并不安全,我们强烈建议使用 --ask-pass 或 SSH 密钥)

ansible_sudo_pass
      sudo 密码(这种方式并不安全,我们强烈建议使用 --ask-sudo-pass)

ansible_sudo_exe (new in version 1.8)
      sudo 命令路径(适用于1.8及以上版本)

ansible_connection
      与主机的连接类型.比如:local, ssh 或者 paramiko. Ansible 1.2 以前默认使用 paramiko.1.2 以后默认使用 'smart','smart' 方式会根据是否支持 ControlPersist, 来判断'ssh' 方式是否可行.

ansible_ssh_private_key_file
      ssh 使用的私钥文件.适用于有多个密钥,而你不想使用 SSH 代理的情况.

ansible_shell_type
      目标系统的shell类型.默认情况下,命令的执行使用 'sh' 语法,可设置为 'csh' 或 'fish'.

ansible_python_interpreter
      目标主机的 python 路径.适用于的情况: 系统中有多个 Python, 或者命令路径不是"/usr/bin/python",比如  \*BSD, 或者 /usr/bin/python
      不是 2.X 版本的 Python.我们不使用 "/usr/bin/env" 机制,因为这要求远程用户的路径设置正确,且要求 "python" 可执行程序名不可为 python以外的名字(实际有可能名为python26).

      与 ansible_python_interpreter 的工作方式相同,可设定如 ruby 或 perl 的路径....
参考Ansible中文权威指南。
2.4 直接使用facts变量
使用命令ansible all -m setup获取到的主机信息,其中的KEY都可以被当作变量引用:
[root@www.wulaoer.org ~]# cat yaml/facts_vars.yaml
---
- hosts: compute-node
  remote_user: root
  tasks:
    - name: write fqdn into fqdn.log
      shell: "echo {{ ansible_fqdn }} {{ ansible_eth1.ipv4.address }} > /tmp/fqdn.log"
上述代码中{{ ansible_fqdn }}就是直接引用的facts变量;
{{ ansible_eth1.ipv4.address }} 引用的值就相当于下面这样。

{
    "ansible_eth1": {
        "ipv4": {
            "address":10.0.1.10,
        },
    },
}
最终{{ ansible_eth1.ipv4.address }}=10.0.1.10
2.5 注册变量
在playbook中用register关键字定义一个变量,这个变量的值就是当前任务执行的输出结果;
[root@www.wulaoer.org ~]# cat yaml/reg_vars.yaml
---
- hosts: load-node
  remote_user: root
  tasks:
    - name: show date
      shell: "/bin/date"
      register: date        # 注册一个变量
    - name: Record time log
      shell: "echo {{ date.stdout }} > /tmp/date.log"
引用注册变量要用 {{ date.stdout }}表示标准输出。
[root@openstack-load1 ~]# cat /tmp/date.log
2018年 03月 29日 星期四 15:52:01 CST
如果直接{{ date }}这样引用,则文件中写入的是如下内容:
{stderr_lines: [], uchanged: True, uend: u2018-03-29 15:49:52.609894, failed: False, ustdout: u2018\u5e74 03\u6708 29\u65e5 \u661f\u671f\u56db 15:49:52 CST, ucmd: u/bin/date, urc: 0, ustart: u2018-03-29 15:49:52.602918, ustderr: u, udelta: u0:00:00.006976, stdout_lines: [u2018\u5e74 03\u6708 29\u65e5 \u661f\u671f\u56db 15:49:52 CST]}
2.6 变量优先级
上述这些变量定义的方法,它们的优先级如下:
[root@www.wulaoer.org ~]# cat yaml/httpd.yaml
---
- hosts: control-node
  remote_user: root
  vars:
    - pkg: httpd
  tasks:
    - name: "install httpd package."
      yum: name={{ pkg }}  state=installed
    - name: "copy httpd configure file to remote host."
      copy: src=/root/conf/httpd.conf dest=/etc/httpd/conf/httpd.conf
      notify: restart httpd
    - name: "boot httpd service."
      service: name=httpd state=started
  handlers:
    - name: restart httpd
      service: name=httpd state=restarted
在使用handlers的过程中,有以下几点需要注意:
[root@www.wulaoer.org ~]# cat yaml/httpd.yaml
---
- hosts: control-node
  remote_user: root
  vars:
    - pkg: httpd
  tasks:
    - name: "install httpd package."
      yum: name={{ pkg }}  state=installed
    - name: "copy httpd configure file to remote host."
      copy: src=/root/conf/httpd.conf dest=/etc/httpd/conf/httpd.conf
      notify: restart httpd
    - name: "start httpd service."
      tags:
        - start_httpd     # 给“start httpd service”这个任务打个标签
      service: name=httpd state=started
  handlers:
    - name: restart httpd
      service: name=httpd state=restarted
在命令行中调用:
[root@www.wulaoer.org ~]# ansible-playbook yaml/httpd.yaml --tags start_httpd
PLAY [control-node] ********************************************************************************************************
TASK [Gathering Facts] *****************************************************************************************************
ok: [openstack-control1]
ok: [openstack-control2]
TASK [start httpd service.] ************************************************************************************************
ok: [openstack-control1]
ok: [openstack-control2]
PLAY RECAP *****************************************************************************************************************
openstack-control1         : ok=2    changed=0    unreachable=0    failed=0
openstack-control2         : ok=2    changed=0    unreachable=0    failed=0
- hosts: load-node,img
  remote_user: root
  tasks:
  - name: "touch flag file"
    command: "touch /tmp/this_is_{{ ansible_distribution }}_system"
    when: (ansible_distribution == "CentOS" and ansible_distribution_major_version == '6') or
          (ansible_distribution == "Debian" and ansible_distribution_major_version == '7')
上述代码中,ansible_distribution和ansible_distribution_major_version都是是Facts变量,分别表示Linux发行版和版本号
执行结果如下图: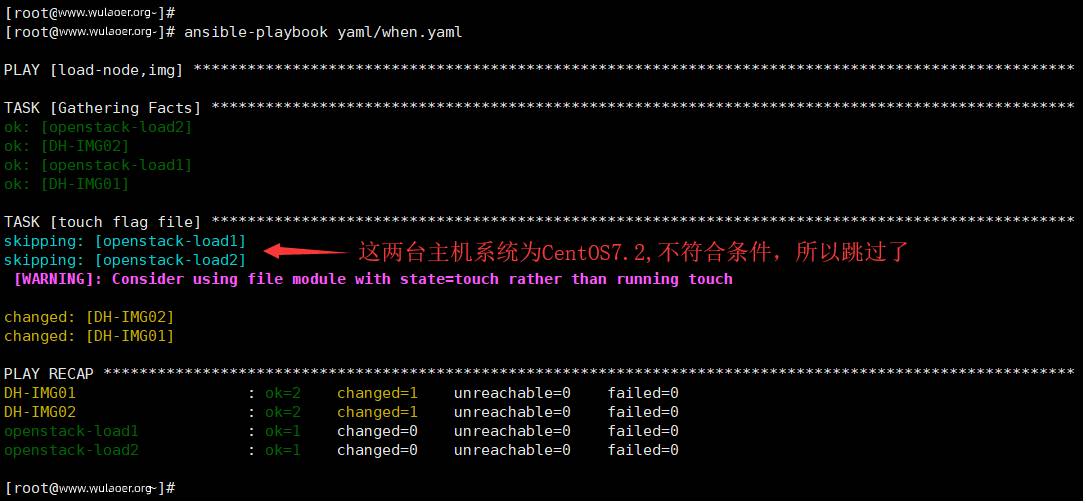
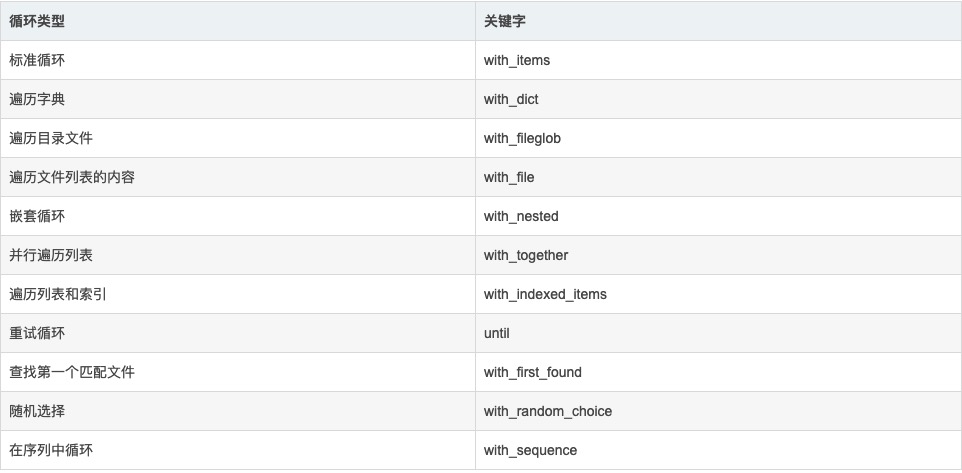 注意:列表中前三个为常用的循环语句。
4.2.1 标准循环 with_items
示例1(with_items_1.yaml):
注意:列表中前三个为常用的循环语句。
4.2.1 标准循环 with_items
示例1(with_items_1.yaml):
---
- name: when and with_items
  hosts: load-node
  remote_user: root
  gather_facts: false
  tasks:
  - name: Create thress groups
    group: name=testgroup6 state=present
    ignore_errors: yes
    register: excu_result
  - name: Append excu_result to tmp.txt
    shell: "echo {{ excu_result }} > /tmp/tmp.txt"
  - name: Create some users
    user: name={{ item }} group=testgroup6 state=present
    when: excu_result|success
    with_items:
      - testuser1
      - testuser2
      - testuser3
释义:
- name: add several users
  user: name={{ item.name }} state=present groups={{ item.groups }}
  with_items:
    - { name: 'testuser1', groups: 'wheel' }
    - { name: 'testuser2', groups: 'root' }
4.2.2 遍历字典 with_dict
输出用户的姓名和电话:
---
- hosts: load-node
  remote_user: root
  tasks:
  - name: print phone records
    debug: msg="User {{ item.key }} is {{ item.value.name }} ({{ item.value.phone }})"
    with_dict: {'alice':{'name':'Alice Appleworth', 'phone':'13243252136'}, 'bob':{'name':'Bob Banarama', 'phone': '18766761211'}}
注意:Playbook中对字典的循环,与python中对字典循环类似,取值方法也一样。
4.2.3 遍历目录文件 with_fileglob
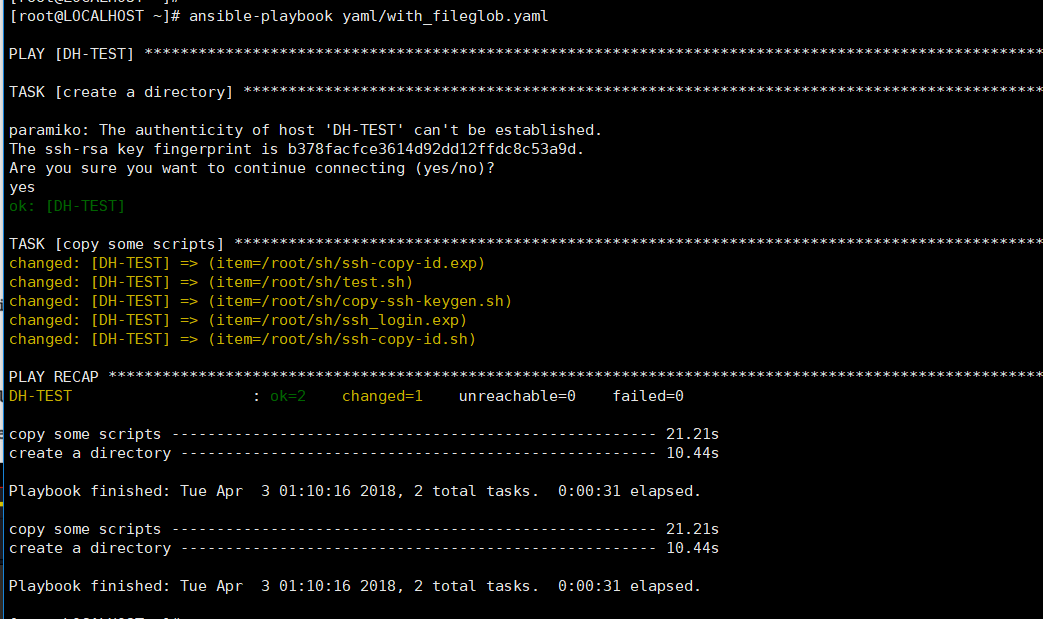
遍历/root/sh/目录下的所有文件,并将其拷贝至目标主机。
[root@www.wulaoer.org ~]# cat yaml/with_fileglob.yaml
---
- hosts: DH-TEST
  remote_user: root
  gather_facts: false
  tasks:
  - name: create a directory
    file: path=/root/script state=directory
    ignore_errors: yes
    register: result
  - name: copy some scripts
    copy: src={{ item }} dest=/root/script owner=root mode=600
    when: result|success
    with_fileglob:
      - /root/sh/*
注意:with_fileglob匹配单个目录中的所有文件,非递归匹配模式。
执行结果:
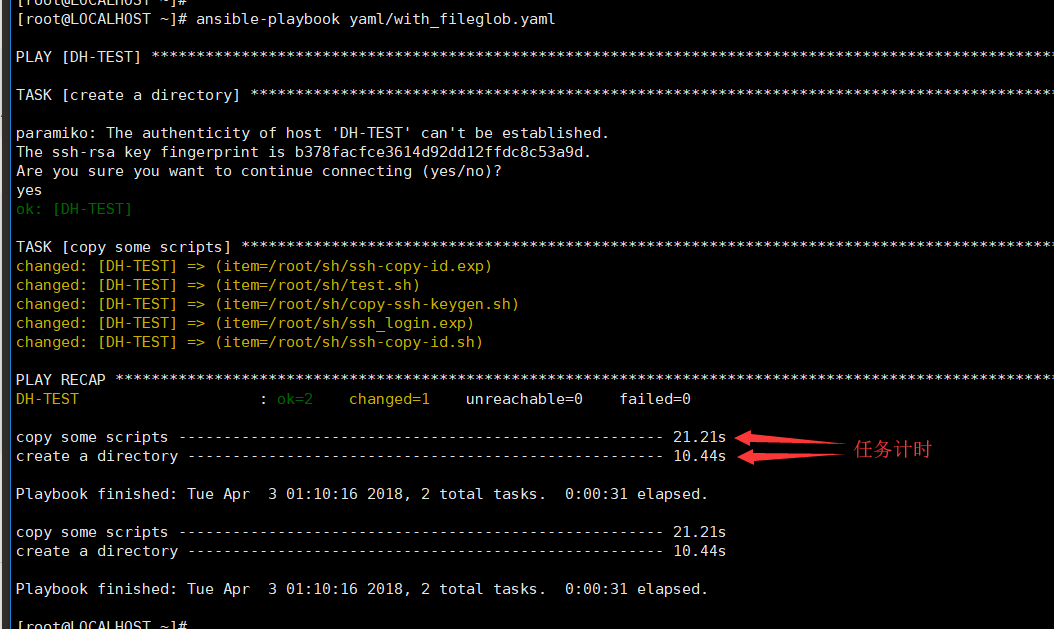
# mkdir callback_plugins
# cd callback_plugins
# wget https://raw.githubusercontent.com/jlafon/ansible-profile/master/callback_plugins/profile_tasks.py
[root@www.wulaoer.org ~]# cat yaml/httpd.yaml
---
- hosts: load-node
  remote_user: root
  vars:
    - pkg: httpd
  tasks:
    - name: "install httpd package."
      yum: name={{ pkg }}  state=installed
    - name: "copy httpd configure file to remote host."
      copy: src=/root/config/httpd.conf dest=/etc/httpd/conf/httpd.conf
      notify: restart httpd
      ignore_errors: true         # 忽略错误
    - name: "start httpd service."
      tags:
        - start_httpd
      service: name=httpd state=started
  handlers:
    - name: restart httpd
      service: name=httpd state=restarted
上述代码中,任务"copy httpd configure file to remote host."中的src是一个不存在的路径,所以此任务运行一定会出错。这个playbook运行结果如下图:
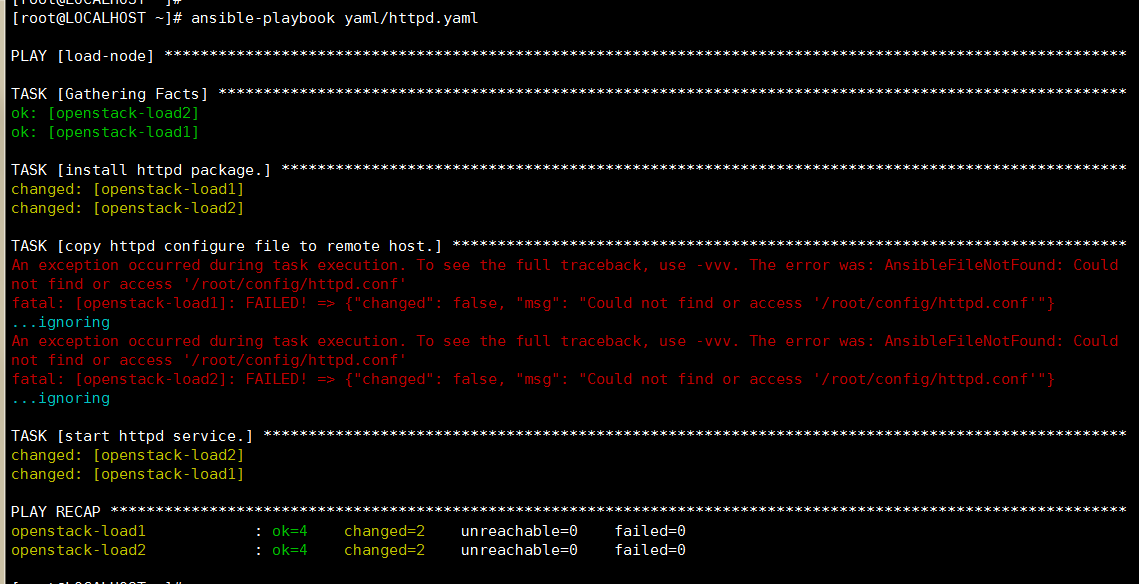 从运行结果图中可以看到有两个
...ignoring,表示忽略了这些错误,并继续执行下面的任务。
6.2 failed_when
当满足一定的条件时,主动抛出错误。
[root@www.wulaoer.org ~]# cat yaml/failed_when.yaml
---
- hosts: DH-TEST
  remote_user: root
  gather_facts: false
  tasks:
  - name: get process
    shell: ps aux | wc -l
    register: process_count
    failed_when: process_count > 3
  - name: touch a file
    file: path=/tmp/test3.txt state=touch owner=root mode=0700
failed_when: process_count > 3当进程数大于3时主动抛出错误,后续任务就不会执行了。如果不满足条件,则不会抛出错误。
6.3 changed_when
[root@www.wulaoer.org ~]# cat yaml/changed_when.yaml
---
- hosts: DH-TEST
  remote_user: root
  gather_facts: false
  tasks:
  - name: touch a file
    file: path=/tmp/changed_test state=touch
上述Playbook执行结果如下图:
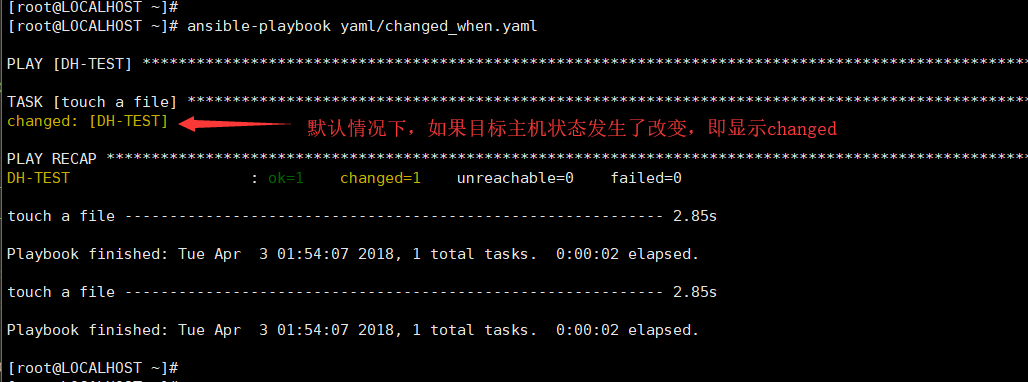 如果想要关闭状态改变的提示,则可以添加
changed_when: false,如下:
[root@www.wulaoer.org ~]# cat yaml/changed_when.yaml
---
- hosts: DH-TEST
  remote_user: root
  gather_facts: false
  tasks:
  - name: touch a file
    file: path=/tmp/changed_testi2 state=touch
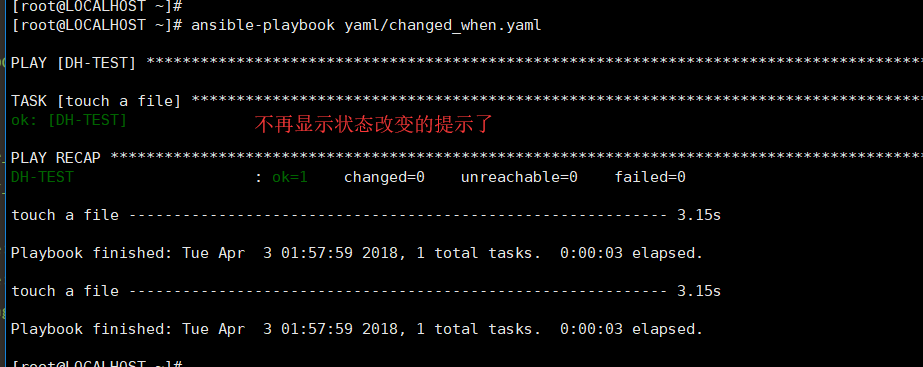
    changed_when: false       # 关闭状态改变提示
执行结果如下图:
site.yml            # 主入口文件
webservers.yml      # webserver类型服务所用的剧本
dbservers.yml       # 数据库类型的服务所用的剧本
files/              # 存放通用的将要被上传的文件
templates/          # 存放通用的模板文件
roles/              # roles目录名称是固定的
   common/          # 此目录下的各个组件是所有角色共用的
     tasks/         # 存放通用的任务文件
     handlers/      # 存放通用的处理器文件
     vars/          # 存放通用的变量文件
     meta/          # 存放通用的角色依赖文件
   webservers/      # 存放webserver类型的服务的各个组件
     files/         # 存放webserver角色需要的上传文件
     templates/     # 存放webserver角色需要的模板文件
     tasks/
     handlers/
     vars/
     meta/
而在playbook中,可以这样使用roles:
---
- hosts: webservers
  roles:
     - common
     - webservers
也可以向roles传递参数,例如:
---
- hosts: webservers
  roles:
    - common
    - { role: foo_app_instance, dir: '/opt/a',  port: 5000 }
    - { role: foo_app_instance, dir: '/opt/b',  port: 5001 }
甚至也可以条件式地使用roles,例如:
---

- hosts: webservers
  roles:
    - { role: some_role, when: "ansible_os_family == 'RedHat'"
[root@www.wulaoer.org ansible-examples-master]# tree [root@www.wulaoer.org ansible-examples-master]# tree lamp_simple
lamp_simple
├── group_vars
│   ├── all
│   └── dbservers
├── hosts
├── LICENSE.md
├── README.md
├── roles
│   ├── common
│   │   ├── handlers
│   │   │   └── main.yml
│   │   ├── tasks
│   │   │   └── main.yml
│   │   └── templates
│   │       └── ntp.conf.j2
│   ├── db
│   │   ├── handlers
│   │   │   └── main.yml
│   │   ├── tasks
│   │   │   └── main.yml
│   │   └── templates
│   │       └── my.cnf.j2
│   └── web
│       ├── handlers
│       │   └── main.yml
│       ├── tasks
│       │   ├── copy_code.yml
│       │   ├── install_httpd.yml
│       │   └── main.yml
│       └── templates
│           └── index.php.j2
└── site.yml

14 directories, 17 files
查看各个playbook的内容:
[webservers]
web3

[dbservers]
web2
---
# This playbook deploys the whole application stack in this site.

- name: apply common configuration to all nodes
  hosts: all
  remote_user: root

  roles:
    - common

- name: configure and deploy the webservers and application code
  hosts: webservers
  remote_user: root

  roles:
    - web

- name: deploy MySQL and configure the databases
  hosts: dbservers
  remote_user: root

  roles:
    - db
# Variables listed here are applicable to all host groups

httpd_port: 80
ntpserver: 192.168.1.2
repository: https://github.com/bennojoy/mywebapp.git
# cat lamp_simple/group_vars/dbservers
---
# The variables file used by the playbooks in the dbservers group.
# These don't have to be explicitly imported by vars_files: they are autopopulated.

mysqlservice: mysqld
mysql_port: 3306
dbuser: foouser
dbname: foodb
upassword: abc
---
# Handler to handle common notifications. Handlers are called by other plays.
# See http://docs.ansible.com/playbooks_intro.html for more information about handlers.

- name: restart ntp
  service: name=ntpd state=restarted

- name: restart iptables
  service: name=iptables state=restarted
---
# This playbook contains common plays that will be run on all nodes.

- name: Install ntp
  yum: name=ntp state=present
  tags: ntp

- name: Configure ntp file
  template: src=ntp.conf.j2 dest=/etc/ntp.conf
  tags: ntp
  notify: restart ntp

- name: Start the ntp service
  service: name=ntpd state=started enabled=yes
  tags: ntp

- name: test to see if selinux is running
  command: getenforce
  register: sestatus
  changed_when: false
driftfile /var/lib/ntp/drift

restrict 127.0.0.1
restrict -6 ::1

server {{ ntpserver }}

includefile /etc/ntp/crypto/pw

keys /etc/ntp/keys
---
# Handler to handle DB tier notifications

- name: restart mysql
  service: name=mysqld state=restarted

- name: restart iptables
  service: name=iptables state=restarted[root@LOCALHOST ansible-examples-master]# cat lamp_simple/roles/db/handlers/main.yml
---
# Handler to handle DB tier notifications

- name: restart mysql
  service: name=mysqld state=restarted

- name: restart iptables
  service: name=iptables state=restarted
---
# This playbook will install mysql and create db user and give permissions.

- name: Install Mysql package
  yum: name={{ item }} state=installed
  with_items:
   - mysql-server
   - MySQL-python
   - libselinux-python
   - libsemanage-python

- name: Configure SELinux to start mysql on any port
  seboolean: name=mysql_connect_any state=true persistent=yes
  when: sestatus.rc != 0

- name: Create Mysql configuration file
  template: src=my.cnf.j2 dest=/etc/my.cnf
  notify:
  - restart mysql

- name: Start Mysql Service
  service: name=mysqld state=started enabled=yes

- name: insert iptables rule
  lineinfile: dest=/etc/sysconfig/iptables state=present regexp="{{ mysql_port }}"
              insertafter="^:OUTPUT " line="-A INPUT -p tcp  --dport {{ mysql_port }} -j  ACCEPT"
  notify: restart iptables

- name: Create Application Database
  mysql_db: name={{ dbname }} state=present

- name: Create Application DB User
  mysql_user: name={{ dbuser }} password={{ upassword }} priv=*.*:ALL host='%' state=present
[mysqld]
datadir=/var/lib/mysql
socket=/var/lib/mysql/mysql.sock
user=mysql
# Disabling symbolic-links is recommended to prevent assorted security risks
symbolic-links=0
port={{ mysql_port }}

[mysqld_safe]
log-error=/var/log/mysqld.log
pid-file=/var/run/mysqld/mysqld.pid
---
# Handler for the webtier: handlers are called by other plays.
# See http://docs.ansible.com/playbooks_intro.html for more information about handlers.

- name: restart iptables
  service: name=iptables state=restarted
---
- include: install_httpd.yml
- include: copy_code.yml
# cat lamp_simple/roles/web/tasks/install_httpd.yml
---
# These tasks install http and the php modules.

- name: Install http and php etc
  yum: name={{ item }} state=present
  with_items:
   - httpd
   - php
   - php-mysql
   - git
   - libsemanage-python
   - libselinux-python

- name: insert iptables rule for httpd
  lineinfile: dest=/etc/sysconfig/iptables create=yes state=present regexp="{{ httpd_port }}" insertafter="^:OUTPUT "
              line="-A INPUT -p tcp  --dport {{ httpd_port }} -j  ACCEPT"
  notify: restart iptables

- name: http service state
  service: name=httpd state=started enabled=yes

- name: Configure SELinux to allow httpd to connect to remote database
  seboolean: name=httpd_can_network_connect_db state=true persistent=yes
  when: sestatus.rc != 0`
# cat lamp_simple/roles/web/tasks/copy_code.yml
---
# These tasks are responsible for copying the latest dev/production code from
# the version control system.

- name: Copy the code from repository
  git: repo={{ repository }} dest=/var/www/html/

- name: Creates the index.php file
  template: src=index.php.j2 dest=/var/www/html/index.php
查看web角色的模板文件:
# cat lamp_simple/roles/web/templates/index.php.j2
<html>
 <head>
  <title>Ansible Application</title>
 </head>
 <body>
 </br>
  <a href=http://{{ ansible_default_ipv4.address }}/index.html>Homepage</a>
 </br>
<?php
 Print "Hello, World! I am a web server configured using Ansible and I am : ";
 echo exec('hostname');
 Print  "</BR>";
echo  "List of Databases: </BR>";
        {% for host in groups['dbservers'] %}
                $link = mysqli_connect('{{ hostvars[host].ansible_default_ipv4.address }}', '{{ hostvars[host].dbuser }}', '{{ hostvars[host].upassword }}') or die(mysqli_connect_error($link));
        {% endfor %}
        $res = mysqli_query($link, "SHOW DATABASES;");
        while ($row = mysqli_fetch_assoc($res)) {
                echo $row['Database'] . "\n";
        }
?>
</body>
</html>
执行这个roles
# ansile-playbook -i lamp_simple/hosts lamp_simple/site.yml
[root@www.wulaoer.org tasks]# ansible-galaxy --help
Usage: ansible-galaxy [delete|import|info|init|install|list|login|remove|search|setup] [--help] [options] ...

Options:
  -h, --help            show this help message and exit
  -c, --ignore-certs    Ignore SSL certificate validation errors.
  -s API_SERVER, --server=API_SERVER
                        The API server destination
  -v, --verbose         verbose mode (-vvv for more, -vvvv to enable
                        connection debugging)
  --version             show program's version number and exit

 See 'ansible-galaxy <command> --help' for more information on a specific command.
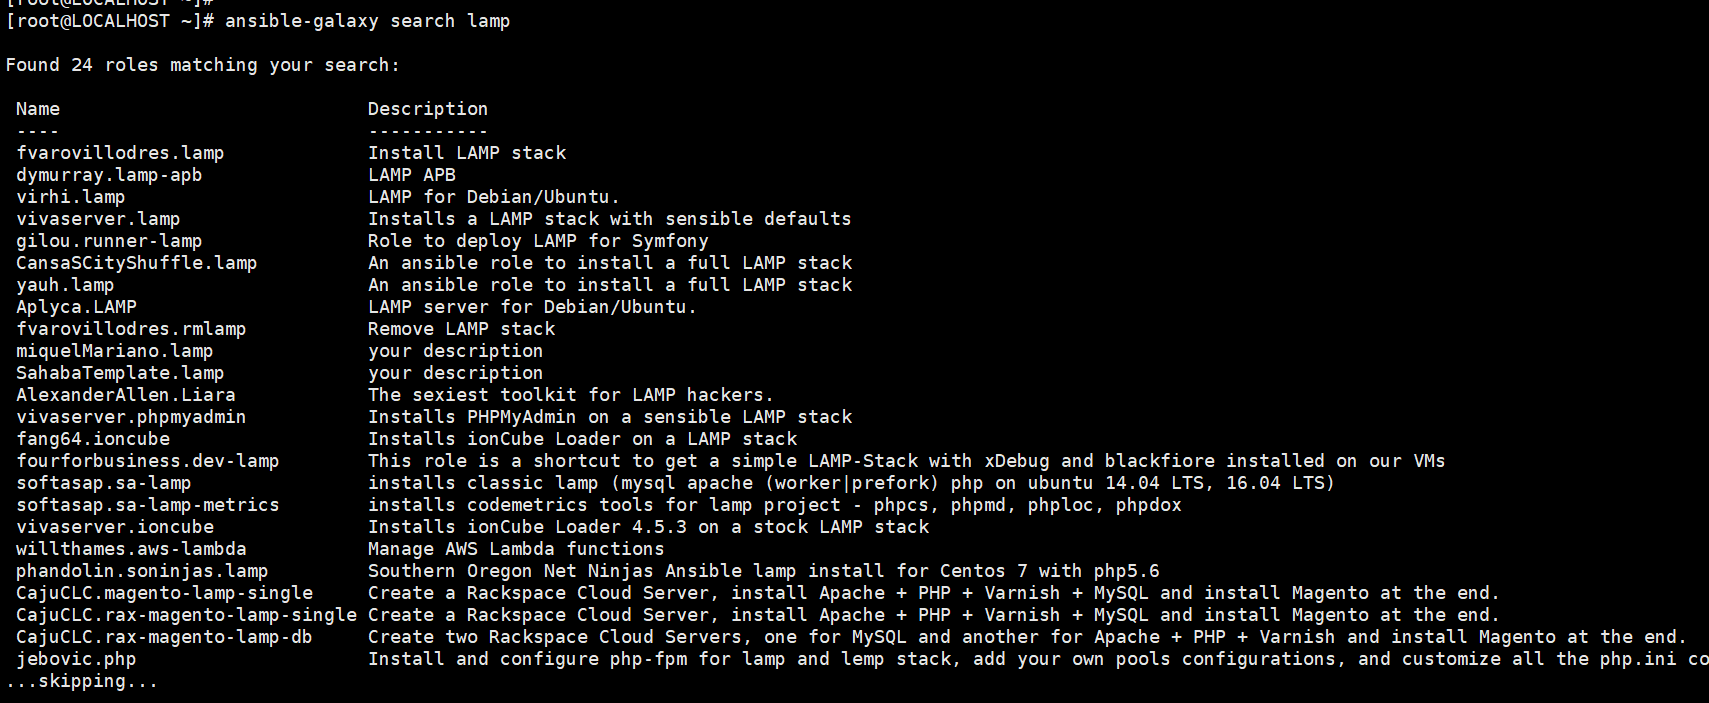
搜索lamp相关的roles:
命令:ansible-galaxy search lamp
结果如下图:
 来安装一个搜索到的角色:
命令:ansible-galaxy install vivaserver.lamp
来安装一个搜索到的角色:
命令:ansible-galaxy install vivaserver.lamp
[root@www.wulaoer.org ~]# ansible-galaxy install vivaserver.lamp
- downloading role 'lamp', owned by vivaserver
- downloading role from https://github.com/vivaserver/ansible-lamp/archive/master.tar.gz
- extracting vivaserver.lamp to /root/.ansible/roles/vivaserver.lamp
- vivaserver.lamp (master) was installed successfully
根据输出提示,安装的role放在/root/.ansible/roles/vivaserver.lamp 查看这个role目录结构:
[root@www.wulaoer.org vivaserver.lamp]# tree /root/.ansible/roles/vivaserver.lamp/
/root/.ansible/roles/vivaserver.lamp/
├── files
│   ├── favicon.ico
│   └── www.html
├── LICENSE
├── meta
│   └── main.yml
├── README.md
├── screenshot.png
└── tasks
    └── main.yml

3 directories, 7 files
按作者搜索roles:
[root@www.wulaoer.org ~]# ansible-galaxy search zabbix --author dj-wasabi

Found 5 roles matching your search:

 Name                         Description
 ----                         -----------
 dj-wasabi.zabbix-javagateway Installing and maintaining zabbix-javagateway for RedHat/Debian/Ubuntu.
 dj-wasabi.zabbix-server      Installing and maintaining zabbix-server for RedHat/Debian/Ubuntu.
 dj-wasabi.zabbix-web         Installing and maintaining zabbix-web for RedHat/Debian/Ubuntu.
 dj-wasabi.zabbix-proxy       Installing and maintaining zabbix-proxy for RedHat/Debian/Ubuntu.
 dj-wasabi.zabbix-agent       Installing and maintaining zabbix-agent for RedHat/Debian/Ubuntu.
上述命令中 dj-wasabi是作者的用户名 8.2 批量安装多个roles # cat roles.txt user1.role1,v1.0.0 user2.role2,v0.5 user2.role3 安装: # ansible-galaxy install -r roles.txt 注意:本文出自转摘,原文连接:https://blog.csdn.net/yujia_666/article/details/108413415
一、准备工作:确认架构并下载安装包 1.1 确认目标服务器架构 在目标服务器上执行以下命令,确认系统架构: 输出 x8664:对应 amd64 架构(Intel/AMD 64位服务

1\. 环境准备 操作系统:推荐使用 Ubuntu 22.04 / Debian 12 权限:需要 root 或 sudo 权限 网络:确保服务器有公网 IP,并且 UDP 119

我的环境是这样的,在window里共享里一个目录然后需要在pod里可以读取这个目录,想过使用直接把共享目录接入到kubernetes集群里,发现,无法直接读取共享的目录,没有办法,
评论 0