
运维服务
docker离线安装
一、准备工作:确认架构并下载安装包 1.1 确认目标服务器架构 在目标服务器上执行以下命令,确认系统架构: 输出 x8664:对应 amd64 架构(Intel/AMD 64位服务
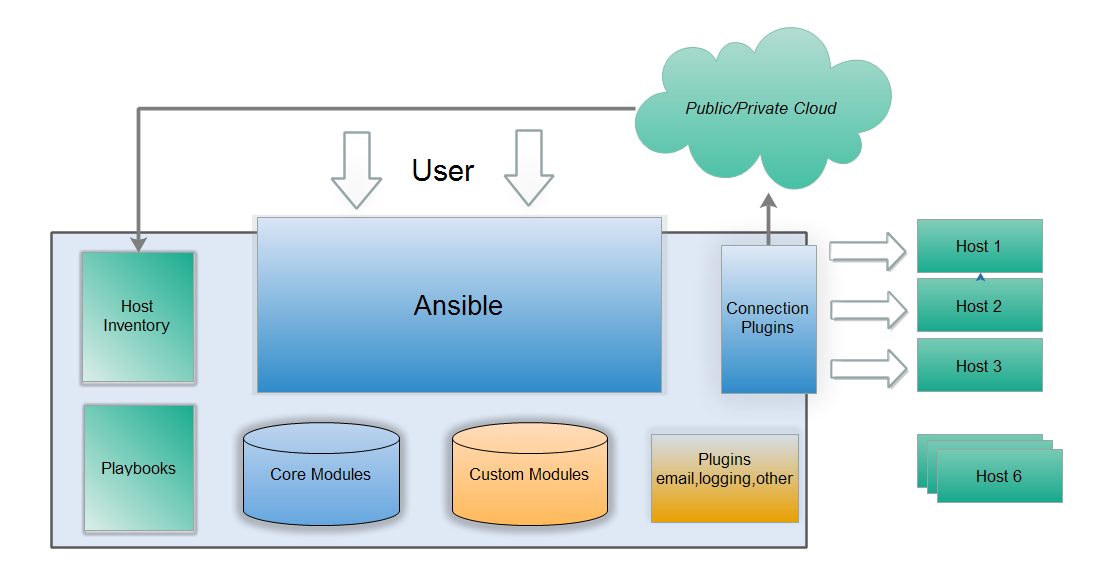 3、特性
(1)、no agents:不需要在被管控主机上安装任何客户端;
(2)、no server:无服务器端,使用时直接运行命令即可;
(3)、modules in any languages:基于模块工作,可使用任何语言开发模块;
(4)、yam1,not code:使用yam1语言定制剧本playbook;
(5)、ssh by default:基于SSH工作;
(6)、strong multi-tier solution:可实现多级指挥。
4、优点
(1)、轻量级,无需在客户端安装agent,更新时,只需要在操作机上进行一次更新即可;
(2)、批量任务执行可以写成脚本,而且不用分发到远程就可以执行;
(3)、使用python编写,维护更简单,ruby语法过于复杂;
(4)、支持sudo。
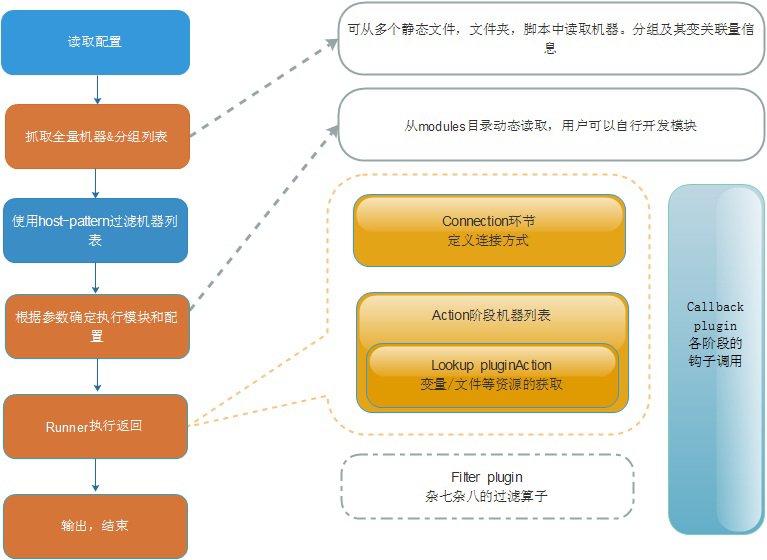
5、任务执行流程
3、特性
(1)、no agents:不需要在被管控主机上安装任何客户端;
(2)、no server:无服务器端,使用时直接运行命令即可;
(3)、modules in any languages:基于模块工作,可使用任何语言开发模块;
(4)、yam1,not code:使用yam1语言定制剧本playbook;
(5)、ssh by default:基于SSH工作;
(6)、strong multi-tier solution:可实现多级指挥。
4、优点
(1)、轻量级,无需在客户端安装agent,更新时,只需要在操作机上进行一次更新即可;
(2)、批量任务执行可以写成脚本,而且不用分发到远程就可以执行;
(3)、使用python编写,维护更简单,ruby语法过于复杂;
(4)、支持sudo。
5、任务执行流程
Wulaoer 10.211.55.22  服务端
Server03 10.211.55.21  客户端
[root@Wulaoer ~]# wget https://www.python.org/ftp/python/2.7.8/Python-2.7.8.tgz
[root@Wulaoer ~]# tar -zxf Python-2.7.8.tgz
[root@Wulaoer ~]# cd Python-2.7.8
[root@Wulaoer Python-2.7.8]# ./configure --prefix=/usr/local/
[root@Wulaoer Python-2.7.8]# make
[root@Wulaoer Python-2.7.8]# make install
注:将python头文件拷贝到标准目录,以避免编译ansible时,找不到所需的头文件
[root@Wulaoer Python-2.7.8]# cd /usr/local/include/python2.7/
[root@Wulaoer python2.7]# cp -a ./* /usr/local/include/
注:备份旧版的python,并符号链接新版的python
[root@Wulaoer python2.7]# cd /usr/bin/
[root@Wulaoer bin]# mv python python2.6
mv:是否覆盖"python2.6"? y
[root@Wulaoer bin]# ln -s /usr/local/bin/python
注:修改yum脚本,使其指向旧版本的python,已避免其无法运行
[root@Wulaoer bin]# vi /usr/bin/yum

#!/usr/bin/python --> #!/usr/bin/python2.6
(2)、setuptools模块安装
[root@Wulaoer ~]# wget https://pypi.python.org/packages/source/s/setuptools/setuptools-7.0.tar.gz --no-check-certificate
[root@Wulaoer ~]# tar -zxf setuptools-7.0.tar.gz
[root@Wulaoer ~]# cd setuptools-7.0
[root@Wulaoer setuptools-7.0]# python setup.py install
(3)、pycrypto模块安装
[root@Wulaoer ~]# wget https://pypi.python.org/packages/source/p/pycrypto/pycrypto-2.6.1.tar.gz --no-check-certificate
[root@Wulaoer ~]# tar -zxf pycrypto-2.6.1.tar.gz
[root@Wulaoer ~]# cd pycrypto-2.6.1
[root@Wulaoer pycrypto-2.6.1]# python setup.py install
(4)、PyYAML模块安装
[root@Wulaoer ~]# wget http://pyyaml.org/download/libyaml/yaml-0.1.5.tar.gz
[root@Wulaoer ~]# tar -zxf yaml-0.1.5.tar.gz
[root@Wulaoer ~]# cd yaml-0.1.5
[root@Wulaoer yaml-0.1.5]# ./configure --prefix=/usr/local/
[root@Wulaoer yaml-0.1.5]# make
[root@Wulaoer yaml-0.1.5]# make install

[root@Wulaoer ~]# wget https://pypi.python.org/packages/source/P/PyYAML/PyYAML-3.11.tar.gz --no-check-certificate
[root@Wulaoer ~]# tar -zxf PyYAML-3.11.tar.gz
[root@Wulaoer ~]# cd PyYAML-3.11
[root@Wulaoer PyYAML-3.11]# python setup.py install
(5)、Jinja2模块安装
[root@Wulaoer ~]# wget https://pypi.python.org/packages/source/M/MarkupSafe/MarkupSafe-0.9.3.tar.gz --no-check-certificate
[root@Wulaoer ~]# tar -zxf MarkupSafe-0.9.3.tar.gz
[root@Wulaoer ~]# cd MarkupSafe-0.9.3
[root@Wulaoer MarkupSafe-0.9.3]# python setup.py install

[root@Wulaoer ~]# wget https://pypi.python.org/packages/source/J/Jinja2/Jinja2-2.7.3.tar.gz --no-check-certificate
[root@Wulaoer ~]# tar -zxf Jinja2-2.7.3.tar.gz
[root@Wulaoer ~]# cd Jinja2-2.7.3
[root@Wulaoer Jinja2-2.7.3]# python setup.py install
(6)、paramiko模块安装
[root@Wulaoer ~]# wget https://pypi.python.org/packages/source/e/ecdsa/ecdsa-0.11.tar.gz --no-check-certificate
[root@Wulaoer ~]# tar -zxf ecdsa-0.11.tar.gz
[root@Wulaoer ~]# cd ecdsa-0.11
[root@Wulaoer ecdsa-0.11]# python setup.py install
[root@Wulaoer ~]# wget https://pypi.python.org/packages/source/p/paramiko/paramiko-1.15.1.tar.gz --no-check-certificate
[root@Wulaoer ~]# tar -zxf paramiko-1.15.1.tar.gz
[root@Wulaoer ~]# cd paramiko-1.15.1
[root@Wulaoer paramiko-1.15.1]# python setup.py install
(7)、simplejson模块安装
[root@Wulaoer ~]# wget https://pypi.python.org/packages/source/s/simplejson/simplejson-3.6.5.tar.gz --no-check-certificate
[root@Wulaoer ~]# tar -zxf simplejson-3.6.5.tar.gz
[root@Wulaoer ~]# cd simplejson-3.6.5
[root@Wulaoer simplejson-3.6.5]# python setup.py install
(8)、ansible安装
[root@Wulaoer ~]# wget https://codeload.github.com/ansible/ansible/tar.gz/v1.7.2
[root@Wulaoer ~]# tar -zxf ansible-1.7.2.tar.gz
[root@Wulaoer ~]# cd ansible-1.7.2
[root@Wulaoer ansible-1.7.2]# python setup.py install
2、Ansible配置 (1)、SSH免密钥登录设置 生成公钥私钥
[root@Wulaoer ~]# ssh-keygen -t rsa -P ''
Generating public/private rsa key pair.
Enter file in which to save the key (/root/.ssh/id_rsa): /root/.ssh/id_rsa_storml
注:写入新人文件(将 /root/.ssh/id_rsa_storml.pub分发到其他服务器,并在所有服务器上执行如下指令)
yum install -y epel-release
yum install -y ansible
查看一下absible的版本
[root@Wulaoer~]# ansible --version
ansible 2.8.2
  config file = /etc/ansible/ansible.cfg
  configured module search path = [u'/root/.ansible/plugins/modules', u'/usr/share/ansible/plugins/modules']
  ansible python module location = /usr/lib/python2.7/site-packages/ansible
  executable location = /usr/bin/ansible
  python version = 2.7.5 (default, Jun 20 2019, 20:27:34) [GCC 4.8.5 20150623 (Red Hat 4.8.5-36)]
以上是安装方法,下面对ansible做配置,实现批量操作 先在服务端创建SSH公钥认证
[root@Wulaoer ~]# ssh-keygen -t rsa
Generating public/private rsa key pair.
Enter file in which to save the key (/root/.ssh/id_rsa):
Created directory '/root/.ssh'.
Enter passphrase (empty for no passphrase):
Enter same passphrase again:
Your identification has been saved in /root/.ssh/id_rsa.
Your public key has been saved in /root/.ssh/id_rsa.pub.
The key fingerprint is:
49:dc:b3:5b:34:08:1f:a1:3b:ba:99:ac:b3:8b:f7:70 root@Server04
The key's randomart image is:
+--[ RSA 2048]----+
|        . o.     |
|       . = o     |
|        + = o    |
|       . o + .   |
|        S . .    |
|       . . o     |
|    . E   .      |
|   .o+ +         |
|  ..+**          |
+-----------------+
把ansible的公钥推送到客户端上
[root@Wulaoer ~]# ssh-copy-id -i root@10.211.55.21
The authenticity of host '10.211.55.21 (10.211.55.21)' can't be established.
ECDSA key fingerprint is c1:65:c2:76:7f:72:7b:e9:3c:88:9e:8f:a8:1b:5a:57.
Are you sure you want to continue connecting (yes/no)? yes
/usr/bin/ssh-copy-id: INFO: attempting to log in with the new key(s), to filter out any that are already installed
/usr/bin/ssh-copy-id: INFO: 1 key(s) remain to be installed -- if you are prompted now it is to install the new keys
root@10.211.55.21's password:

Number of key(s) added: 1

Now try logging into the machine, with:   "ssh 'root@10.211.55.21'"
and check to make sure that only the key(s) you wanted were added.
验证公钥
[root@Wulaoer ~]# ssh  root@10.211.55.21
Last login: Tue Jul 30 16:31:54 2019 from 10.211.55.2
[root@Server03 ~]# ls
anaconda-ks.cfg  apache-maven-3.1.1-bin.tar.gz  bach.sh  opdoctime3717.tmplog
配置ansible,增加可控制节点,多个节点可以添加多个
[root@Wulaoer ~]# vim /etc/ansible/hosts
..............
[test]        #节点名称
10.211.55.21  #节点ip
测试一下
[root@Wulaoer ~]# ansible -m ping test
10.211.55.21 | SUCCESS => {
    "ansible_facts": {
        "discovered_interpreter_python": "/usr/bin/python"
    },
    "changed": false,
    "ping": "pong"
}
#查看系统运行时间
[root@Wulaoer ~]# ansible -m command -a "uptime" 'test'
10.211.55.21 | CHANGED | rc=0 >>
 16:38:43 up 6 days, 21:43,  2 users,  load average: 0.00, 0.01, 0.05
#查看系统名称
[root@Wulaoer ~]# ansible -m command -a "uname -r" 'test'
10.211.55.21 | CHANGED | rc=0 >>
3.10.0-229.el7.x86_64
#查看ip
[root@Wulaoer ~]# ansible -m command -a "ifconfig eth0" 'test'
10.211.55.21 | CHANGED | rc=0 >>
eth0: flags=4163<UP,BROADCAST,RUNNING,MULTICAST>  mtu 1500
        inet 10.211.55.21  netmask 255.255.255.0  broadcast 10.211.55.255
        inet6 fe80::21c:42ff:fe59:61e0  prefixlen 64  scopeid 0x20<link>
        inet6 fdb2:2c26:f4e4:0:21c:42ff:fe59:61e0  prefixlen 64  scopeid 0x0<global>
        ether 00:1c:42:59:61:e0  txqueuelen 1000  (Ethernet)
        RX packets 23152802  bytes 18204844463 (16.9 GiB)
        RX errors 0  dropped 0  overruns 0  frame 0
        TX packets 16480206  bytes 8458148798 (7.8 GiB)
        TX errors 0  dropped 0 overruns 0  carrier 0  collisions 0
常用监控命令
【监控磁盘空间】
#storm_cluster--》/etc/ansible/hosts 定义的主机分组;
#int(\$5)  其中,$需要在执行时进行转义,否则报错,监控使用率超过30%的磁盘

ansible storm_cluster -m shell -a "df -hP|awk 'NR>1 && int(\$5) > 30'"
【监控进程运行状态】
ansible 192.168.52.101 -m shell -a 'ps auxf|grep snmp'【检查服务运行状态】
ansible 192.168.52.101 -m service -a 'service httpd status'
一、准备工作:确认架构并下载安装包 1.1 确认目标服务器架构 在目标服务器上执行以下命令,确认系统架构: 输出 x8664:对应 amd64 架构(Intel/AMD 64位服务

1\. 环境准备 操作系统:推荐使用 Ubuntu 22.04 / Debian 12 权限:需要 root 或 sudo 权限 网络:确保服务器有公网 IP,并且 UDP 119

我的环境是这样的,在window里共享里一个目录然后需要在pod里可以读取这个目录,想过使用直接把共享目录接入到kubernetes集群里,发现,无法直接读取共享的目录,没有办法,
评论 0