
运维服务
docker离线安装
一、准备工作:确认架构并下载安装包 1.1 确认目标服务器架构 在目标服务器上执行以下命令,确认系统架构: 输出 x8664:对应 amd64 架构(Intel/AMD 64位服务
[root@server09 ~]# tar -zxf jdk-8u231-linux-x64.tar.gz
[root@server09 ~]# mv jdk1.8.0_231 /usr/local/jdk
[root@server09 ~]# vim /etc/profile
.................................................
export JAVA_HOME=/usr/local/jdk
export PATH=$JAVA_HOME/bin:$PATH
export CLASSPATH=.:$JAVA_HOME/lib/dt.jar:$JAVA_HOME/lib/tools.jar
export JRE_HOME=$JAVA_HOME/jre
[root@server09 ~]# source /etc/profile
[root@server09 ~]# java -version
java version "1.8.0_231"
Java(TM) SE Runtime Environment (build 1.8.0_231-b11)
Java HotSpot(TM) 64-Bit Server VM (build 25.231-b11, mixed mode)
jdk已经设置好了,下面我们安装mysql,mysql存储confluence数据。
[root@server09 ~]# wget http://ftp.ntu.edu.tw/MySQL/Downloads/MySQL-5.6/mysql-5.6.47.tar.gz
[root@server09 ~]# tar -zxf mysql-5.6.47.tar.gz
[root@server09 ~]# vim /etc/selinux/config
# 将SELINUX=enforce改成SELINUX=disabled   # 保存,重启
[root@server09 ~]# mv mysql-5.6.47 /usr/local/mysql
[root@server09 ~]# useradd -s  /sbin/nologin mysql
[root@server09 ~]# mkdir /var/lib/mysql/
[root@server09 ~]# yum -y install make gcc-c++ cmake bison-devel  ncurses-devel openssl-devel bison autoconf
[root@server09 ~]# cd /usr/local/mysql
[root@server09 mysql]# cmake \
> -DCMAKE_INSTALL_PREFIX=/usr/local/mysql \
> -DMYSQL_DATADIR=/usr/local/mysql/data \
> -DSYSCONFDIR=/etc \
> -DWITH_MYISAM_STORAGE_ENGINE=1 \
> -DWITH_INNOBASE_STORAGE_ENGINE=1 \
> -DWITH_MEMORY_STORAGE_ENGINE=1 \
> -DWITH_READLINE=1 \
> -DMYSQL_UNIX_ADDR=/var/lib/mysql/mysql.sock \
> -DMYSQL_TCP_PORT=3306 \
> -DENABLED_LOCAL_INFILE=1 \
> -DWITH_PARTITION_STORAGE_ENGINE=1 \
> -DEXTRA_CHARSETS=all \
> -DDEFAULT_CHARSET=utf8 \
> -DDEFAULT_COLLATION=utf8_general_ci
[root@server09 mysql]# make && make install
[root@server09 mysql]# cp support-files/my-default.cnf /etc/my.cnf
cp:是否覆盖"/etc/my.cnf"? y
[root@server09 mysql]# cp support-files/mysql.server /etc/init.d/mysqld
[root@server09 mysql]# chmod a+x /etc/init.d/mysqld
[root@server09 mysql]# chkconfig  --level 345 mysqld on
[root@server09 mysql]# vim /etc/my.cnf
...................................
basedir = /usr/local/mysql
datadir = /usr/local/mysql/data
port = 3306
...................................
[root@server09 mysql]# vim /etc/profile
..........................................
export MYSQL_HOME=/usr/local/mysql
export JAVA_HOME=/usr/local/jdk
export PATH=$JAVA_HOME/bin:$MYSQL_HOME/bin:$PATH
export CLASSPATH=.:$JAVA_HOME/lib/dt.jar:$JAVA_HOME/lib/tools.jar
export JRE_HOME=$JAVA_HOME/jre
[root@server09 mysql]# source /etc/profile
[root@server09 mysql]# chmod +x /usr/local/mysql/scripts/mysql_install_db
[root@server09 mysql]# /usr/local/mysql/scripts/mysql_install_db --user=mysql --defaults-file=/etc/my.cnf --basedir=/usr/local/mysql --datadir=/usr/local/mysql/data
[root@server09 mysql]# vim /etc/my.cnf
.................................
[mysqld]

# Remove leading # and set to the amount of RAM for the most important data
# cache in MySQL. Start at 70% of total RAM for dedicated server, else 10%.
# innodb_buffer_pool_size = 128M

# Remove leading # to turn on a very important data integrity option: logging
# changes to the binary log between backups.
# log_bin
character-set-server=utf8
collation-server=utf8_bin
# These are commonly set, remove the # and set as required.
basedir = /usr/local/mysql
datadir = /usr/local/mysql/data
port = 3306
[root@server09 mysql]#  /etc/init.d/mysqld restart
[root@server09 mysql]# mysql -uroot -p
Enter password:
Welcome to the MySQL monitor.  Commands end with ; or \g.
Your MySQL connection id is 1
Server version: 5.6.47 Source distribution

Copyright (c) 2000, 2020, Oracle and/or its affiliates. All rights reserved.

Oracle is a registered trademark of Oracle Corporation and/or its
affiliates. Other names may be trademarks of their respective
owners.

Type 'help;' or '\h' for help. Type '\c' to clear the current input statement.

mysql> show variables like 'log_error';
+---------------+----------------+
| Variable_name | Value          |
+---------------+----------------+
| log_error     | ./server09.err |
+---------------+----------------+
1 row in set (0.00 sec)

mysql> use mysql
Reading table information for completion of table and column names
You can turn off this feature to get a quicker startup with -A

Database changed
mysql> update user set password=password("root") where user="root";
Query OK, 4 rows affected (0.00 sec)
Rows matched: 4  Changed: 4  Warnings: 0

mysql> flush privileges;
Query OK, 0 rows affected (0.00 sec)
注意:mysql在重启的时候找不到.pid文件解决方法:
[root@server09 init.d]# vim /etc/my.cnf
................................
socket = /var/lib/mysql/mysql.sock
然后在给mysql目录授权
[root@server09 init.d]# chown mysql:mysql -R /var/lib/mysql重新启动一下mysql问题解决
[root@server09 ~]# wget https://www.atlassian.com/software/confluence/downloads/binary/atlassian-confluence-6.13.0-x64.bin
[root@server09 ~]# ./atlassian-confluence-6.13.0-x64.bin
Unpacking JRE ...
Starting Installer ...

This will install Confluence 6.13.0 on your computer.
OK [o, Enter], Cancel [c]

Click Next to continue, or Cancel to exit Setup.

Choose the appropriate installation or upgrade option.
Please choose one of the following:
Express Install (uses default settings) [1],
Custom Install (recommended for advanced users) [2, Enter],
Upgrade an existing Confluence installation [3]
1

See where Confluence will be installed and the settings that will be used.
Installation Directory: /opt/atlassian/confluence  #安装目录
Home Directory: /var/atlassian/application-data/confluence  #数据目录
HTTP Port: 8090  #默认端口,可以使用e修改默认端口
RMI Port: 8000
Install as service: Yes
Install [i, Enter], Exit [e]


Extracting files ...


Please wait a few moments while we configure Confluence.

Installation of Confluence 6.13.0 is complete
Start Confluence now?
Yes [y, Enter], No [n]


Please wait a few moments while Confluence starts up.
Launching Confluence ...

Installation of Confluence 6.13.0 is complete
Your installation of Confluence 6.13.0 is now ready and can be accessed via
your browser.
Confluence 6.13.0 can be accessed at http://localhost:8090
Finishing installation ...
因为我使用要把confluence用在公司的工作中,所以不能使用试用,安装工作环境要把数据和数据库分开,下面创建一个confluence数据库,然后授权并给与访问权限,因为我这里是实验,所以就不把数据库分开了都在一台机器上。
[root@server09 ~]# mysql -uroot -p
Enter password:
Welcome to the MySQL monitor.  Commands end with ; or \g.
Your MySQL connection id is 1
Server version: 5.6.47 Source distribution

Copyright (c) 2000, 2020, Oracle and/or its affiliates. All rights reserved.

Oracle is a registered trademark of Oracle Corporation and/or its
affiliates. Other names may be trademarks of their respective
owners.

Type 'help;' or '\h' for help. Type '\c' to clear the current input statement.

mysql> CREATE DATABASE confluence CHARACTER SET utf8 COLLATE utf8_bin;
Query OK, 1 row affected (0.00 sec)

mysql> CREATE user confluence@localhost IDENTIFIED BY '123456';
Query OK, 0 rows affected (0.00 sec)

mysql> GRANT ALL ON confluenceDB.* to confluence@localhost;
Query OK, 0 rows affected (0.09 sec)
confluence已经安装完成,使用浏览器看一下。
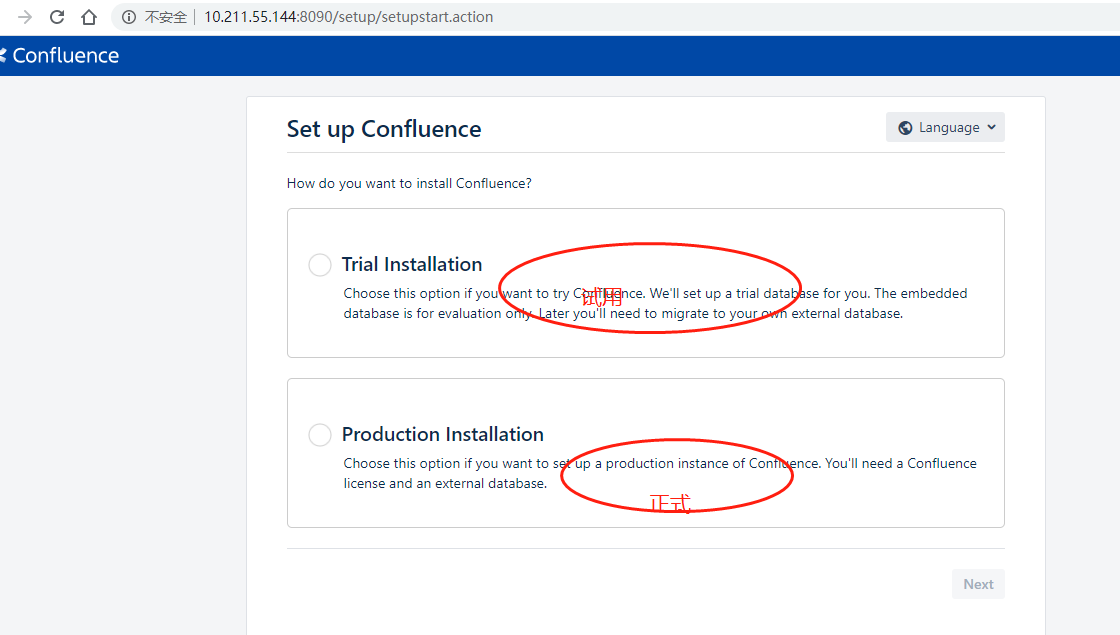 访问正常,到此,confluence已经安装完成,下一个章节confluence的设置,没有了看一些其他的吧。
一、准备工作:确认架构并下载安装包 1.1 确认目标服务器架构 在目标服务器上执行以下命令,确认系统架构: 输出 x8664:对应 amd64 架构(Intel/AMD 64位服务

1\. 环境准备 操作系统:推荐使用 Ubuntu 22.04 / Debian 12 权限:需要 root 或 sudo 权限 网络:确保服务器有公网 IP,并且 UDP 119
我的环境是这样的,在window里共享里一个目录然后需要在pod里可以读取这个目录,想过使用直接把共享目录接入到kubernetes集群里,发现,无法直接读取共享的目录,没有办法,
评论 0