
运维服务
docker离线安装
一、准备工作:确认架构并下载安装包 1.1 确认目标服务器架构 在目标服务器上执行以下命令,确认系统架构: 输出 x8664:对应 amd64 架构(Intel/AMD 64位服务
https://start.spring.io/如下图:
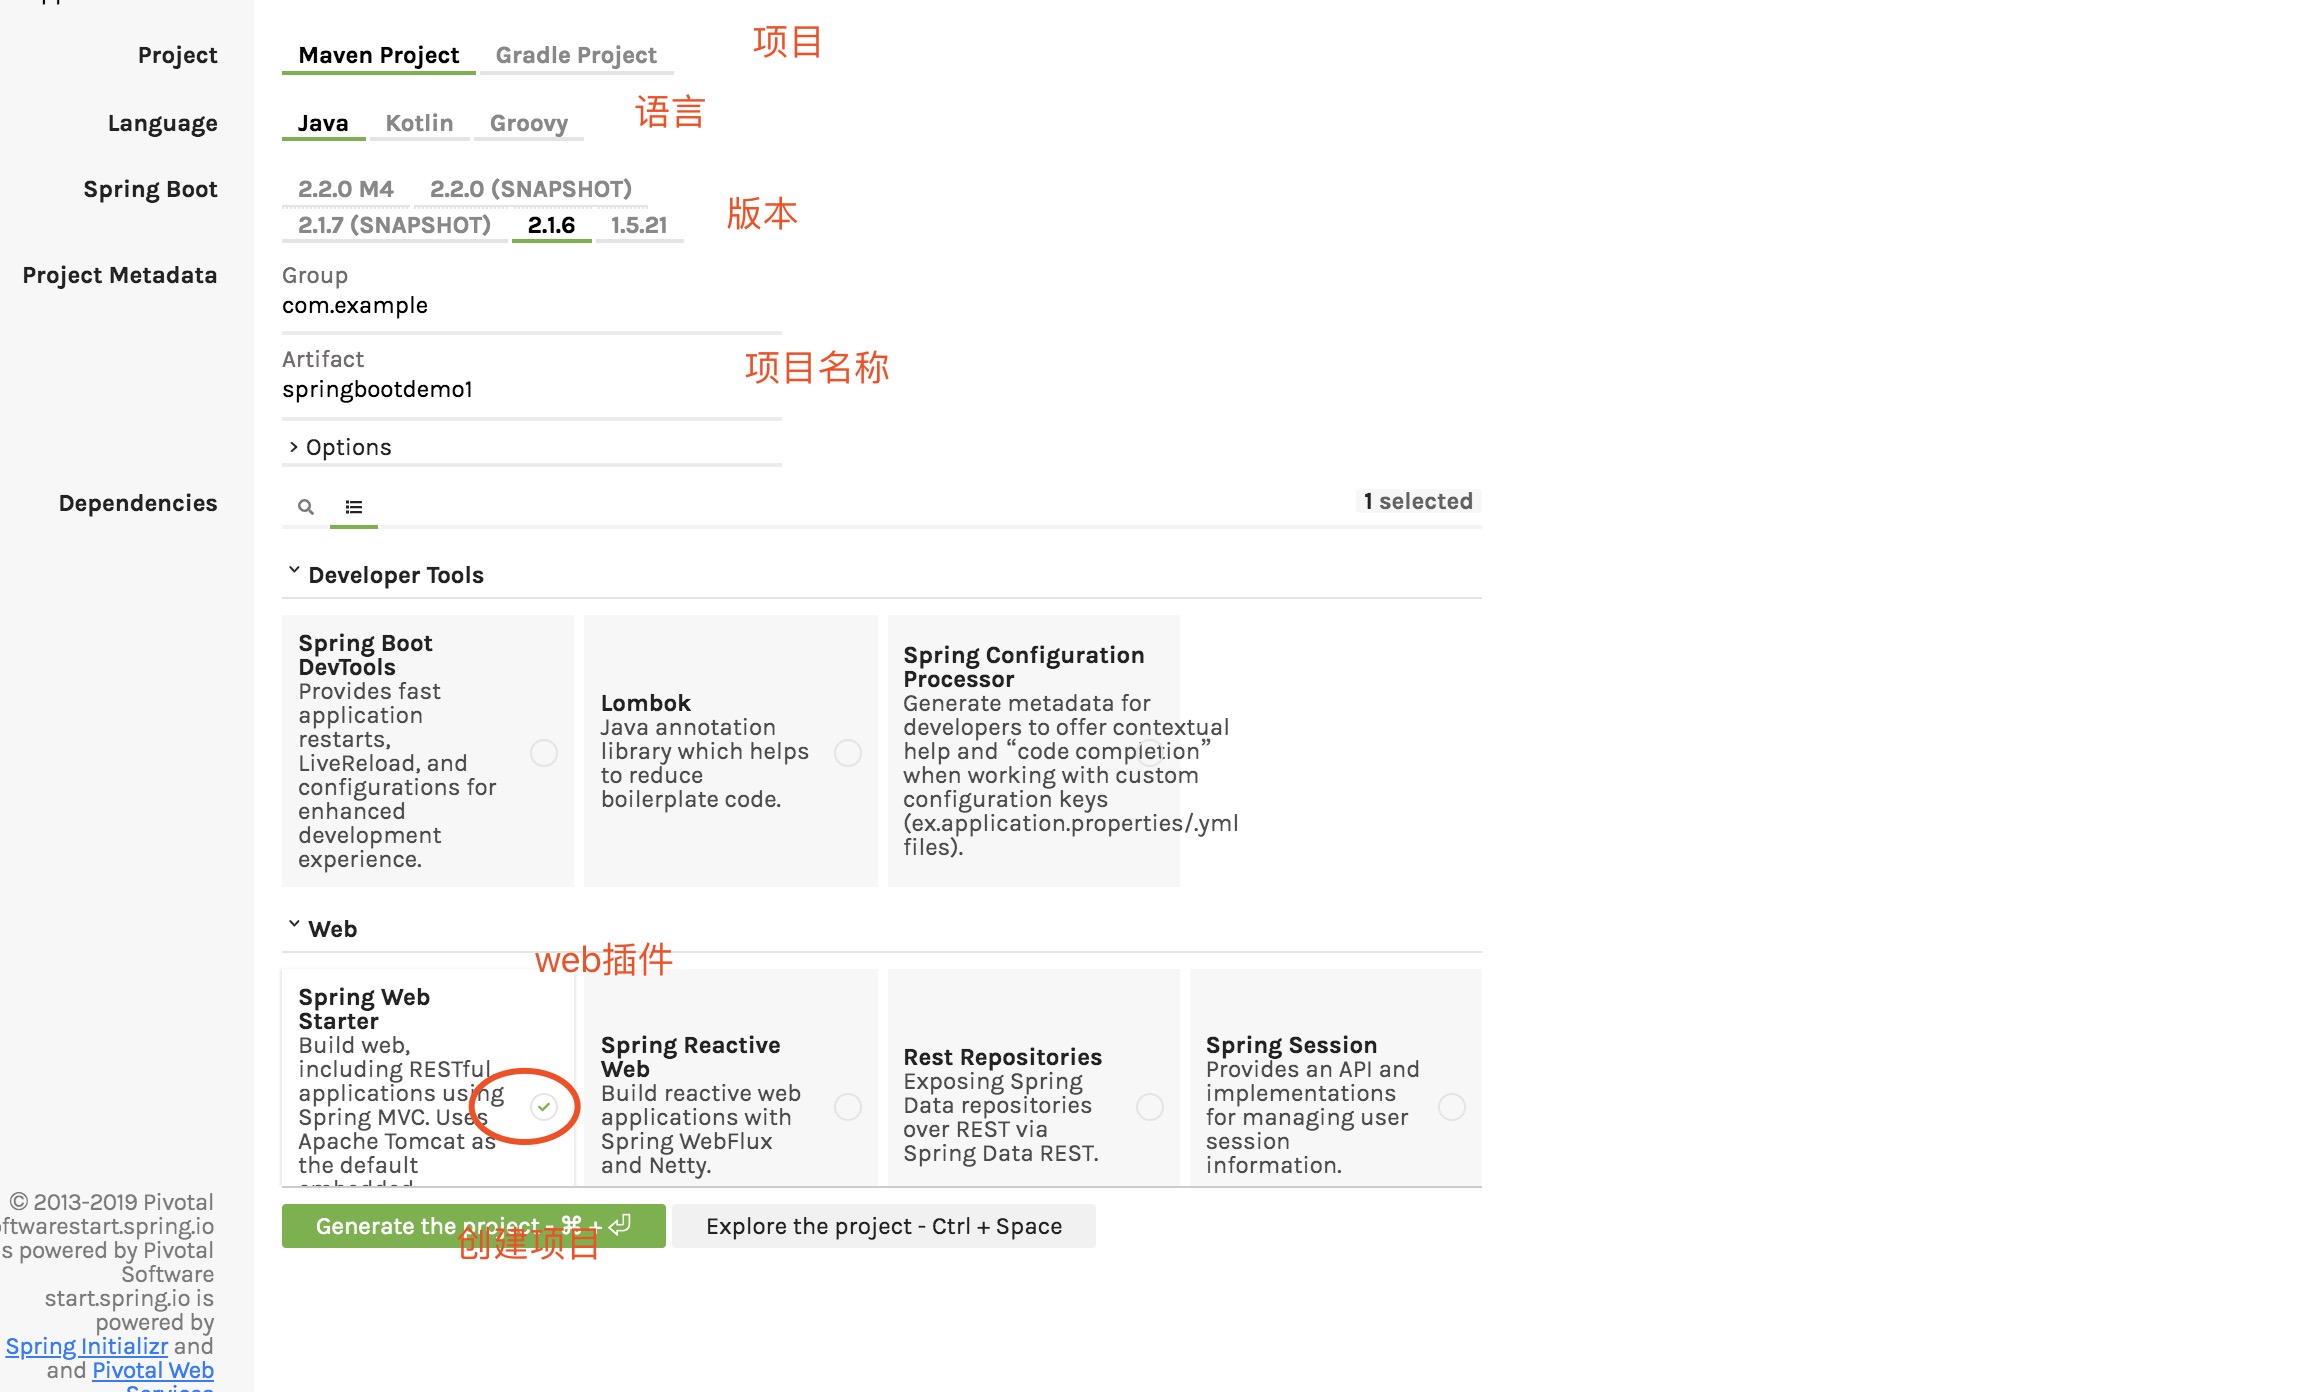 Spring Boot创建完成,下面使用IDEA创建
File---New---Project如下图:
Spring Boot创建完成,下面使用IDEA创建
File---New---Project如下图:
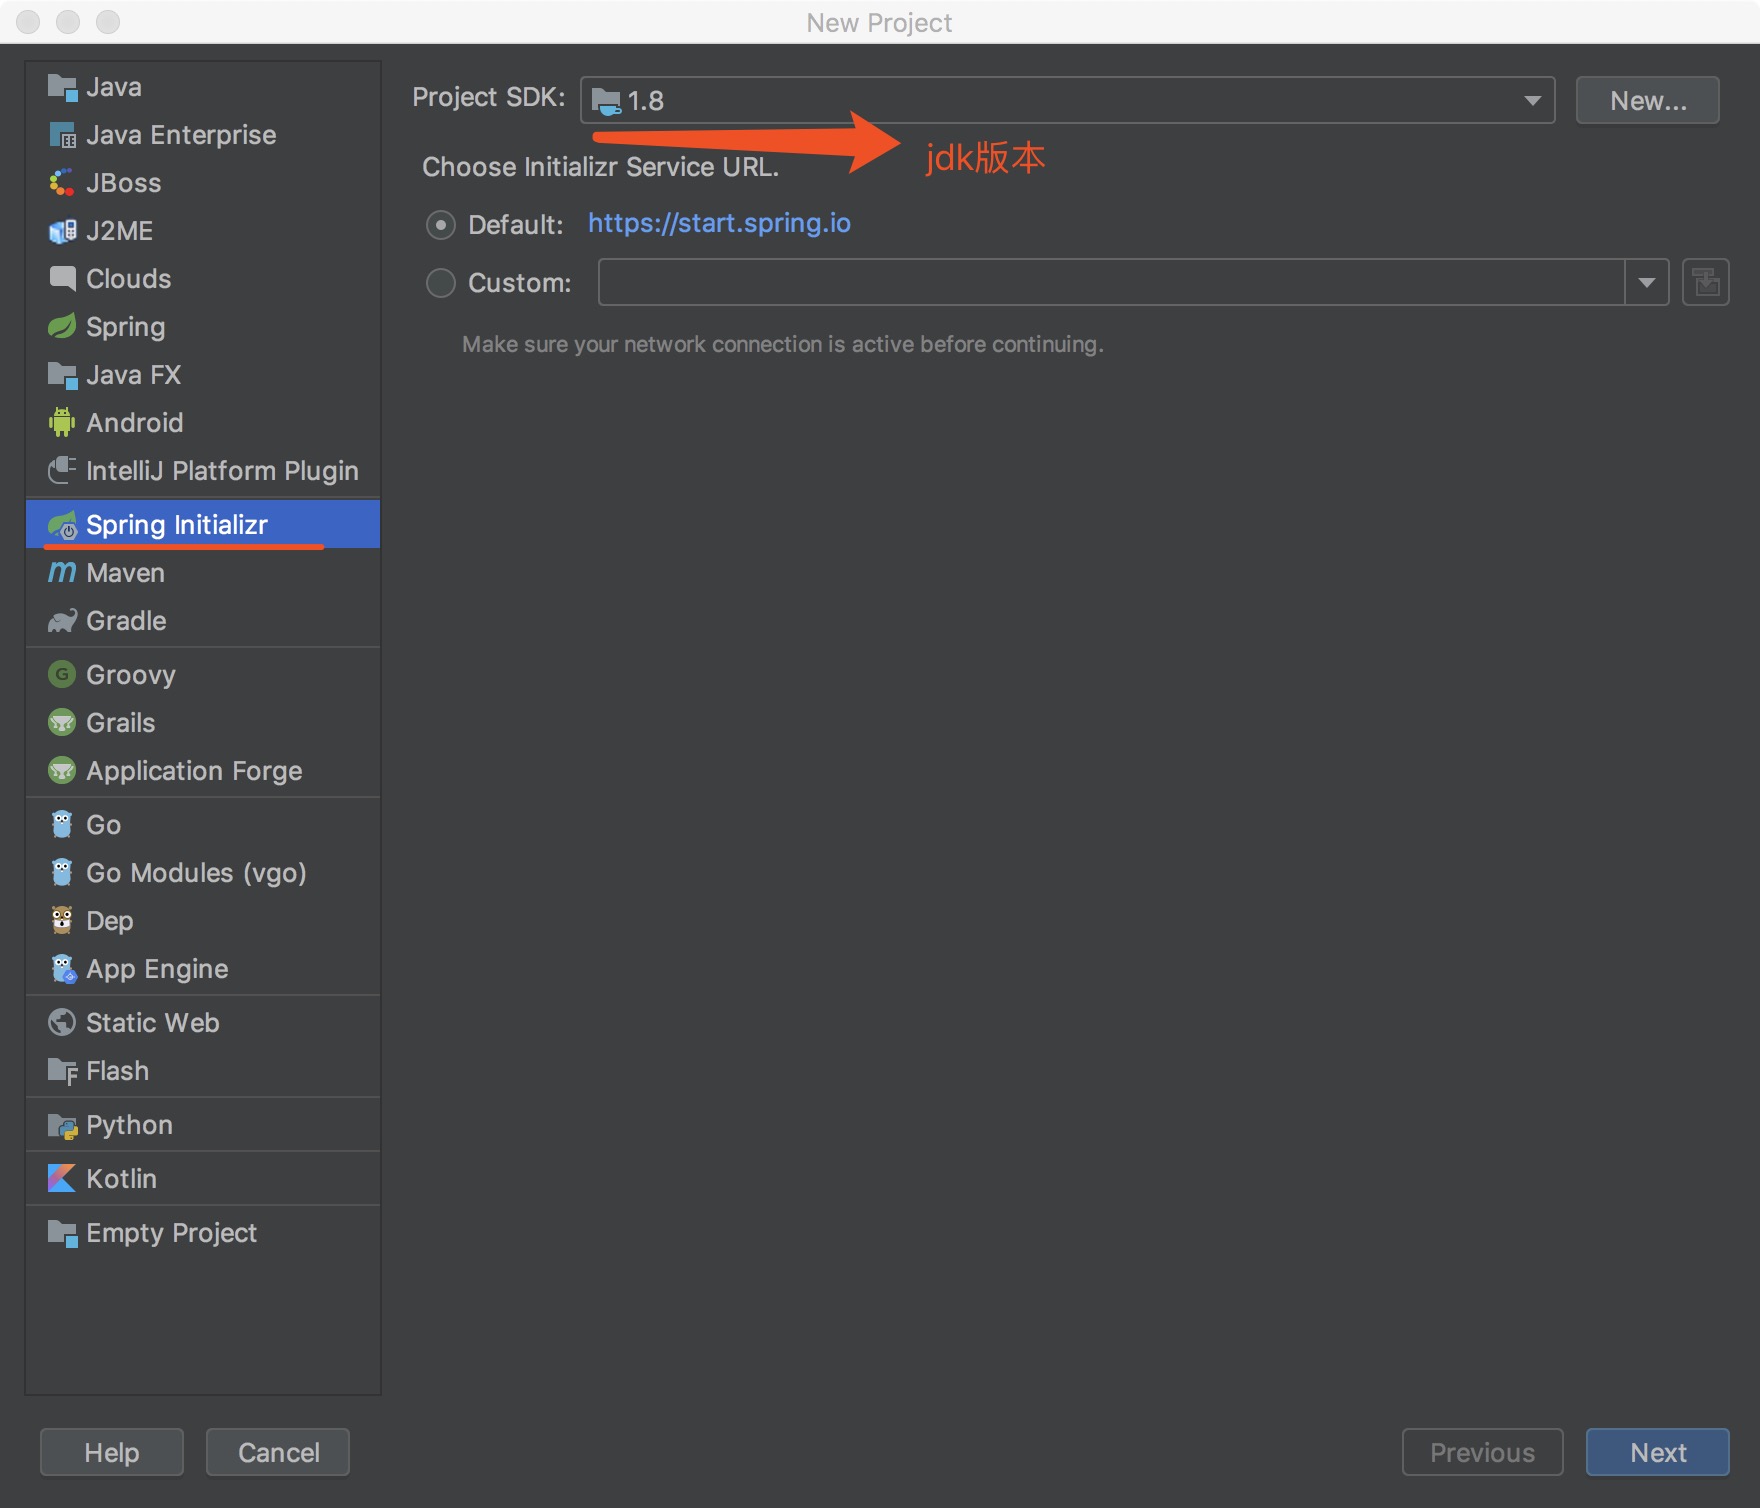 选择 Spring Initializr ,然后选择默认的 url 点击【Next】:
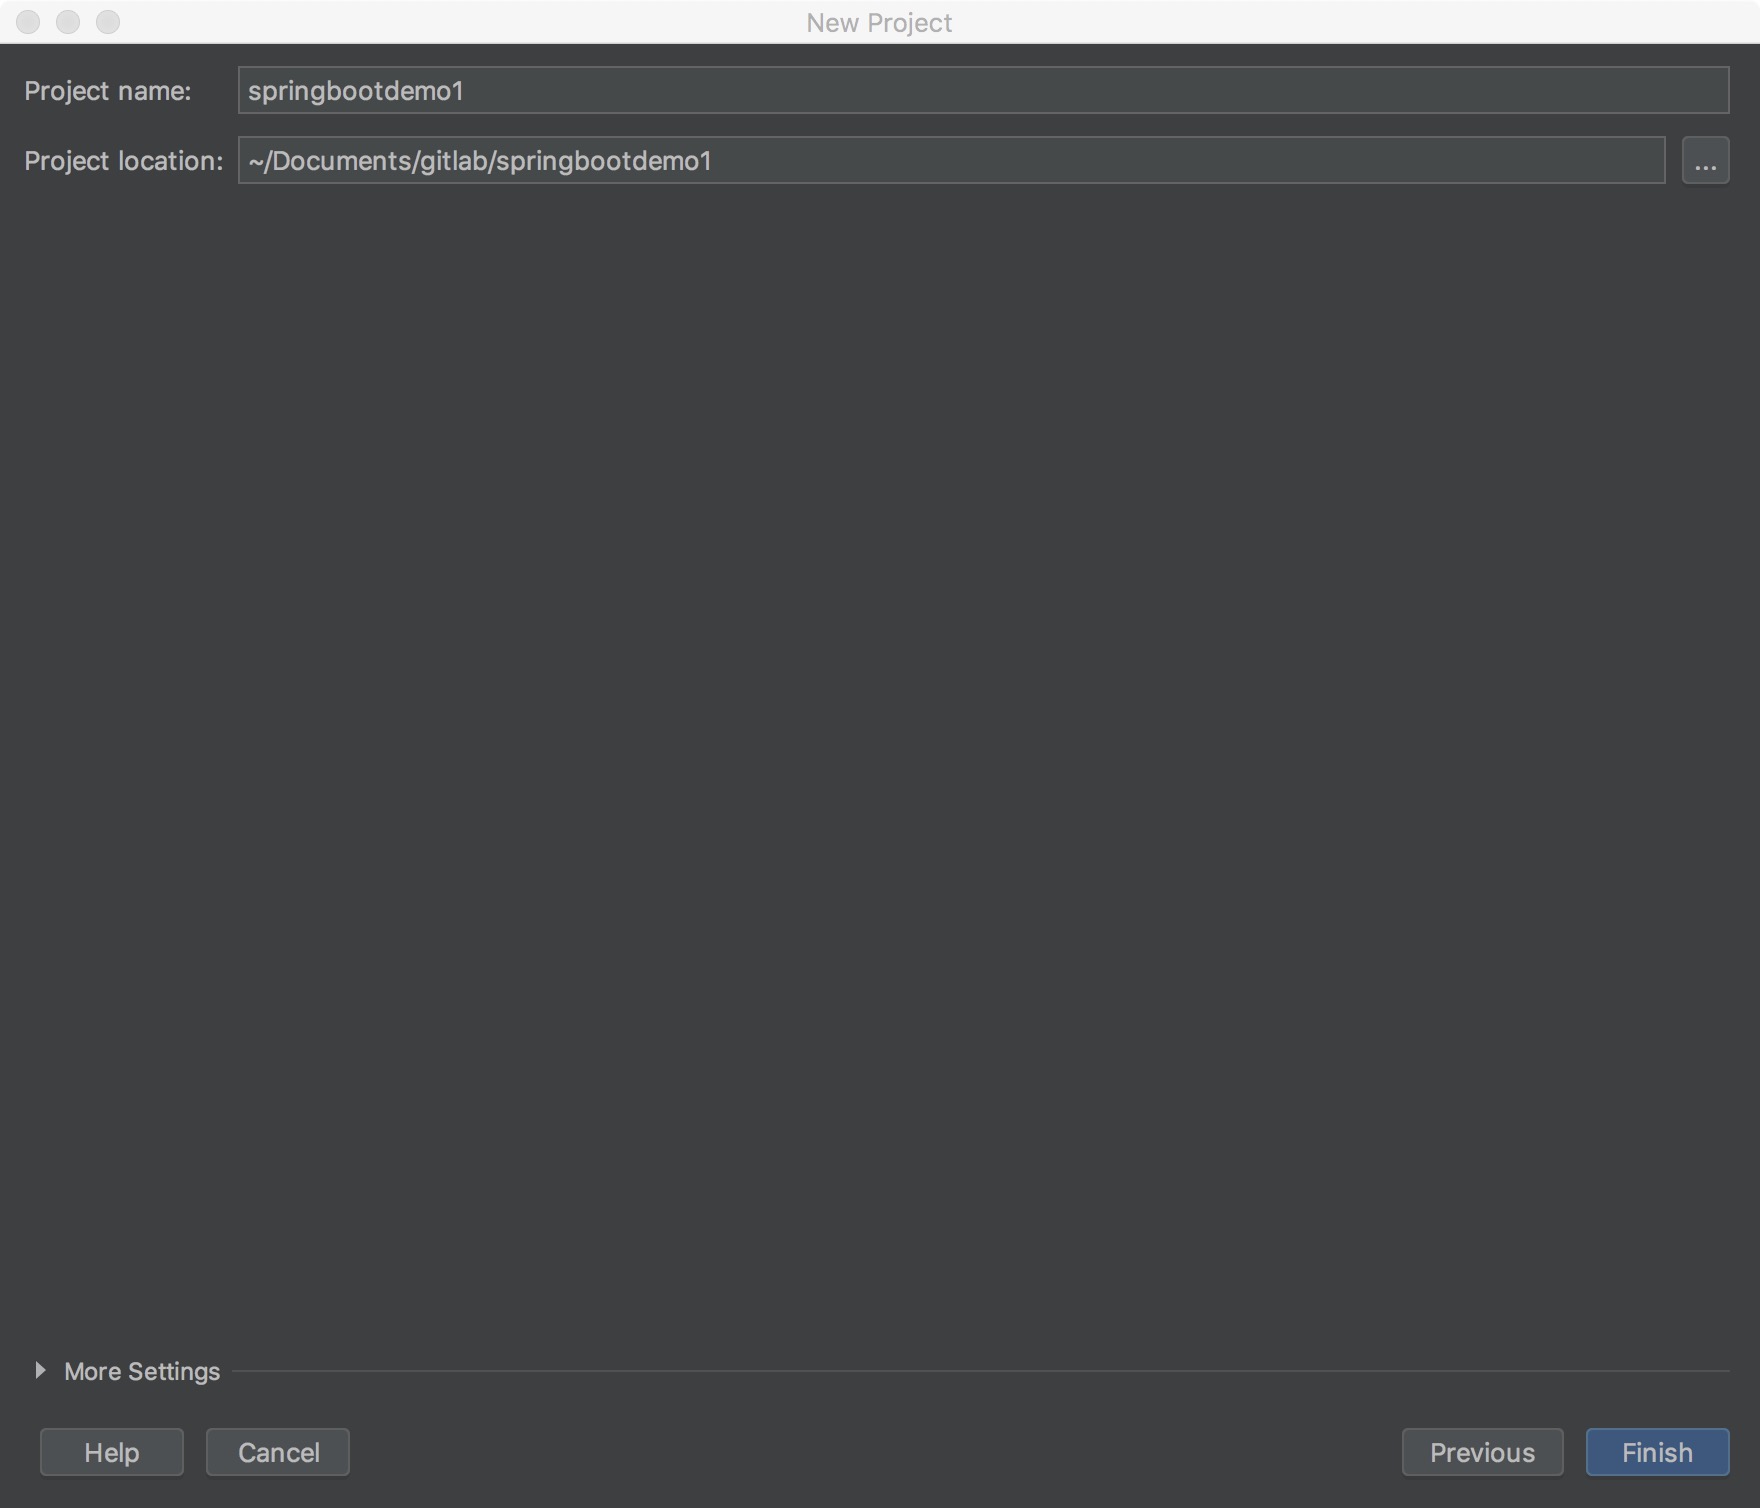
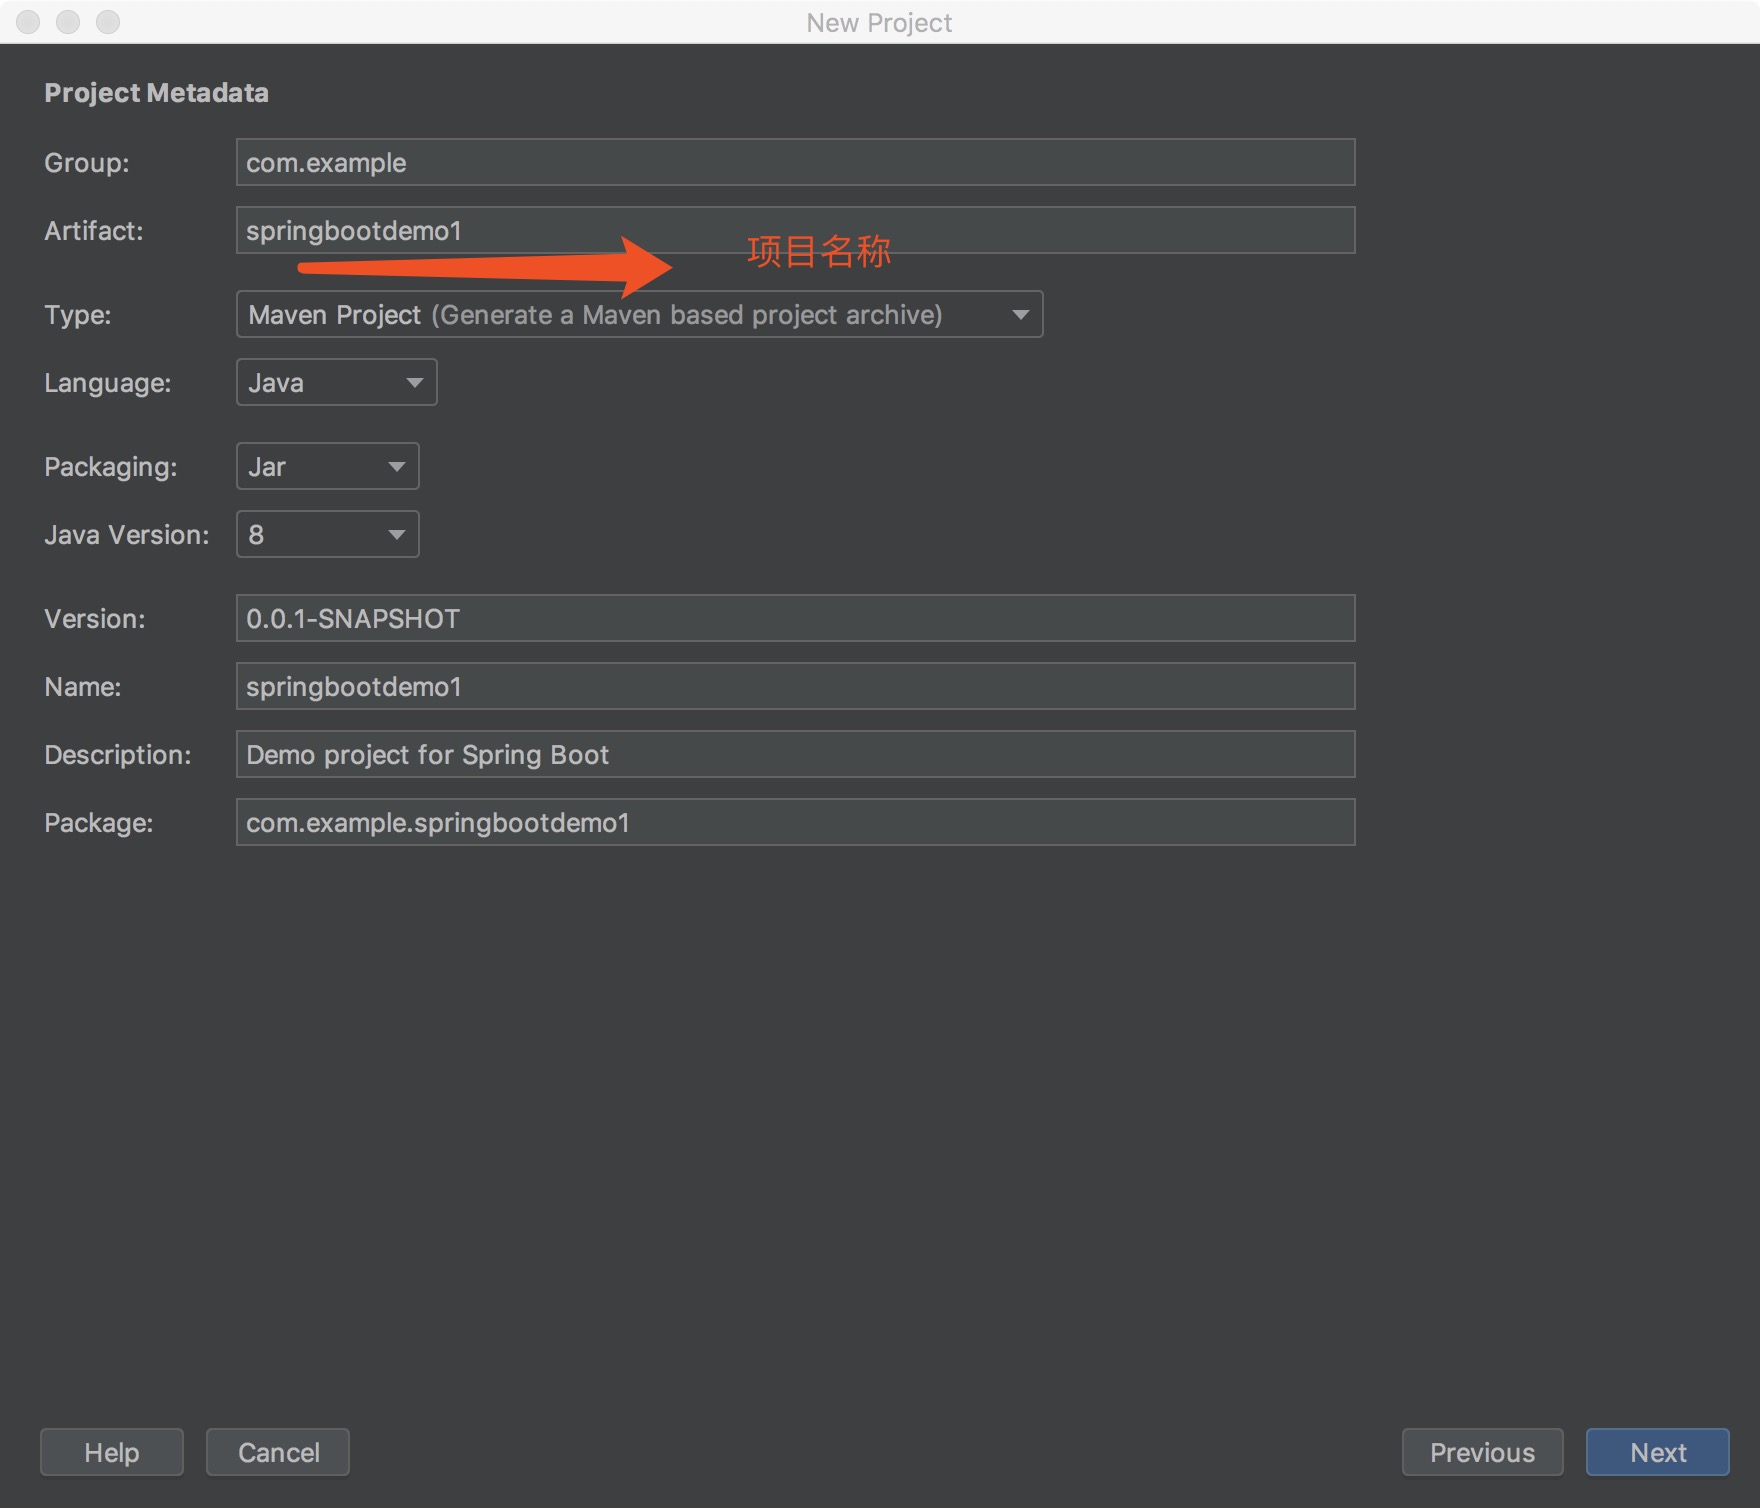 修改一下项目信息
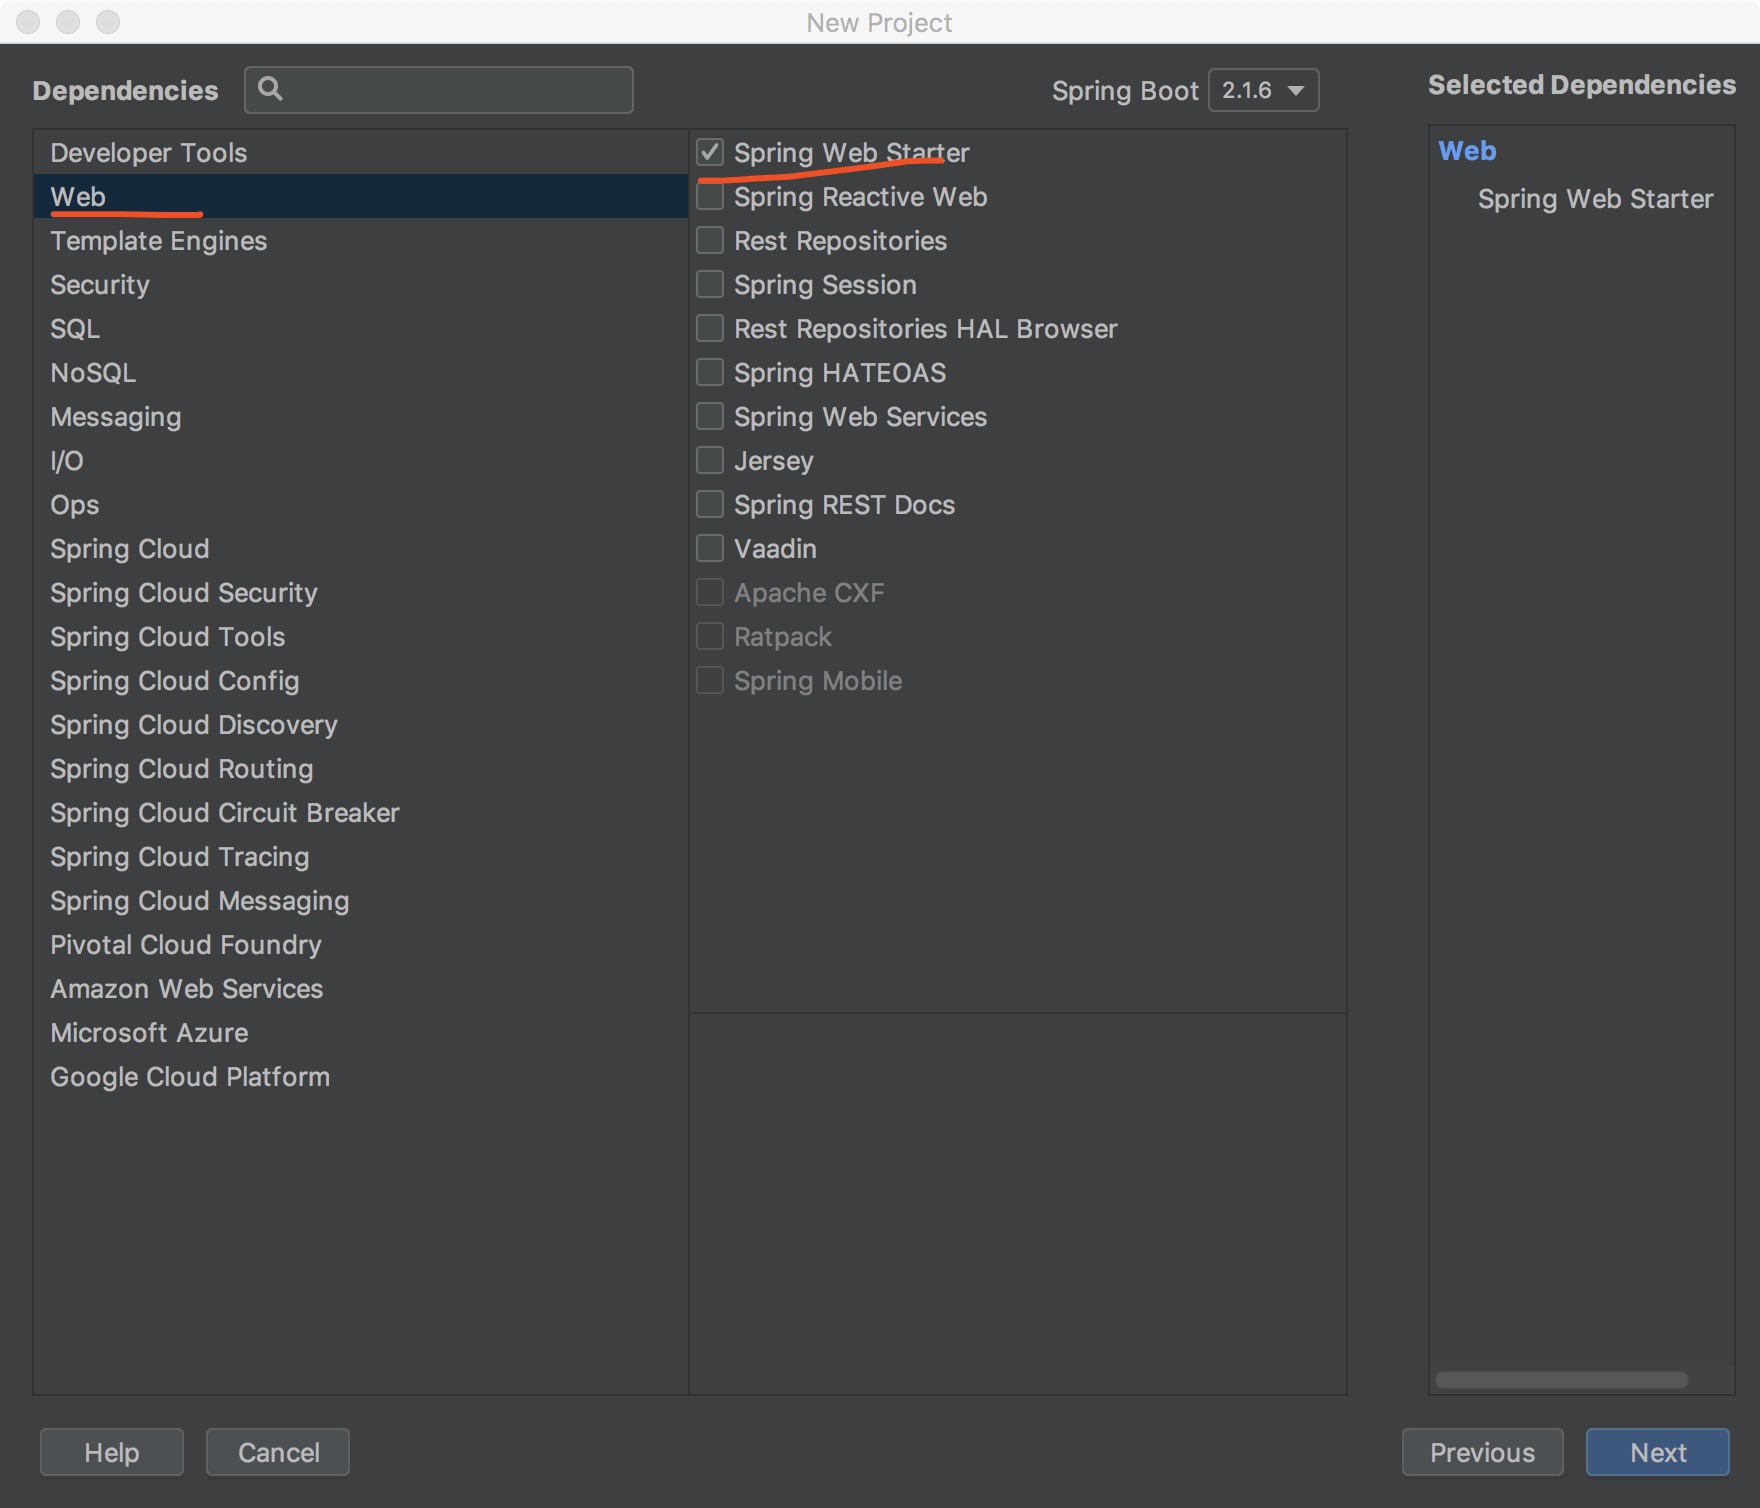 选择好项目的位置,点击【Finish】:
 支持Spring Boot项目创建完了,下面使用IDEA打开一下看看
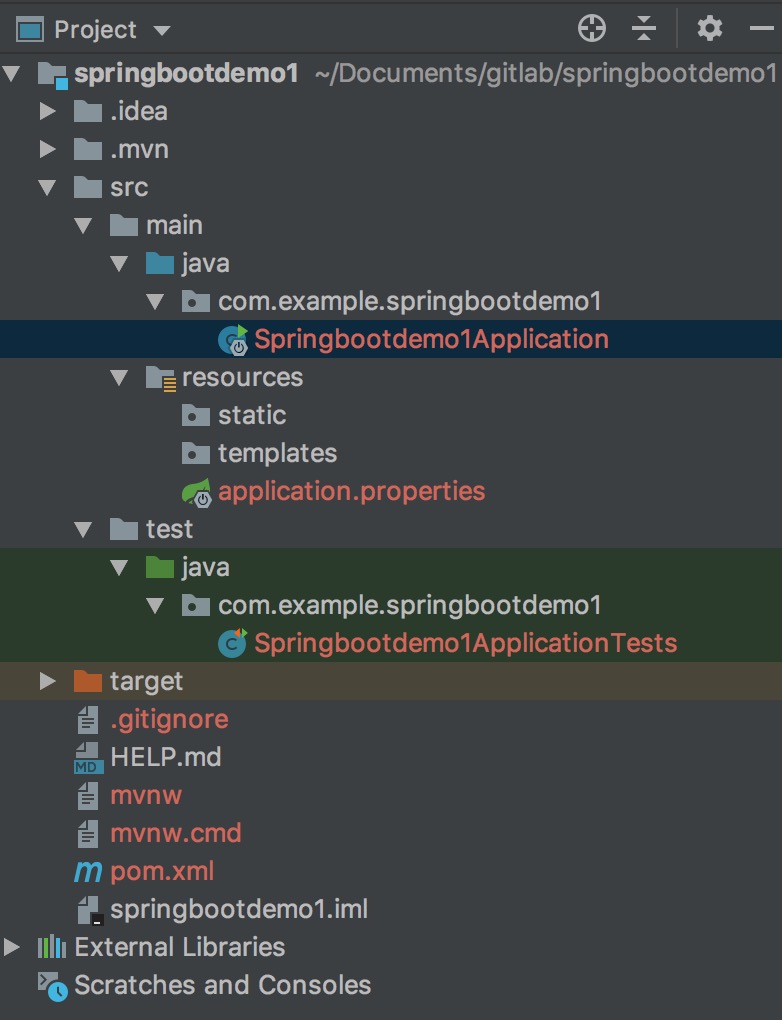 项目结构注解
package com.example.springbootdemo1;

import org.springframework.web.bind.annotation.RequestMapping;
import org.springframework.web.bind.annotation.RestController;


public class HelloController {
    @RequestMapping("/hello")
    public String hello() {
        return "Hello Spring Boot!";
    }
}
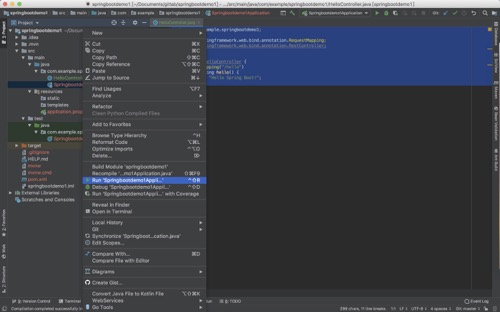
启动Spring Boot项目,鼠标右键Springbootdemo1Application运行
 看一下启动日志
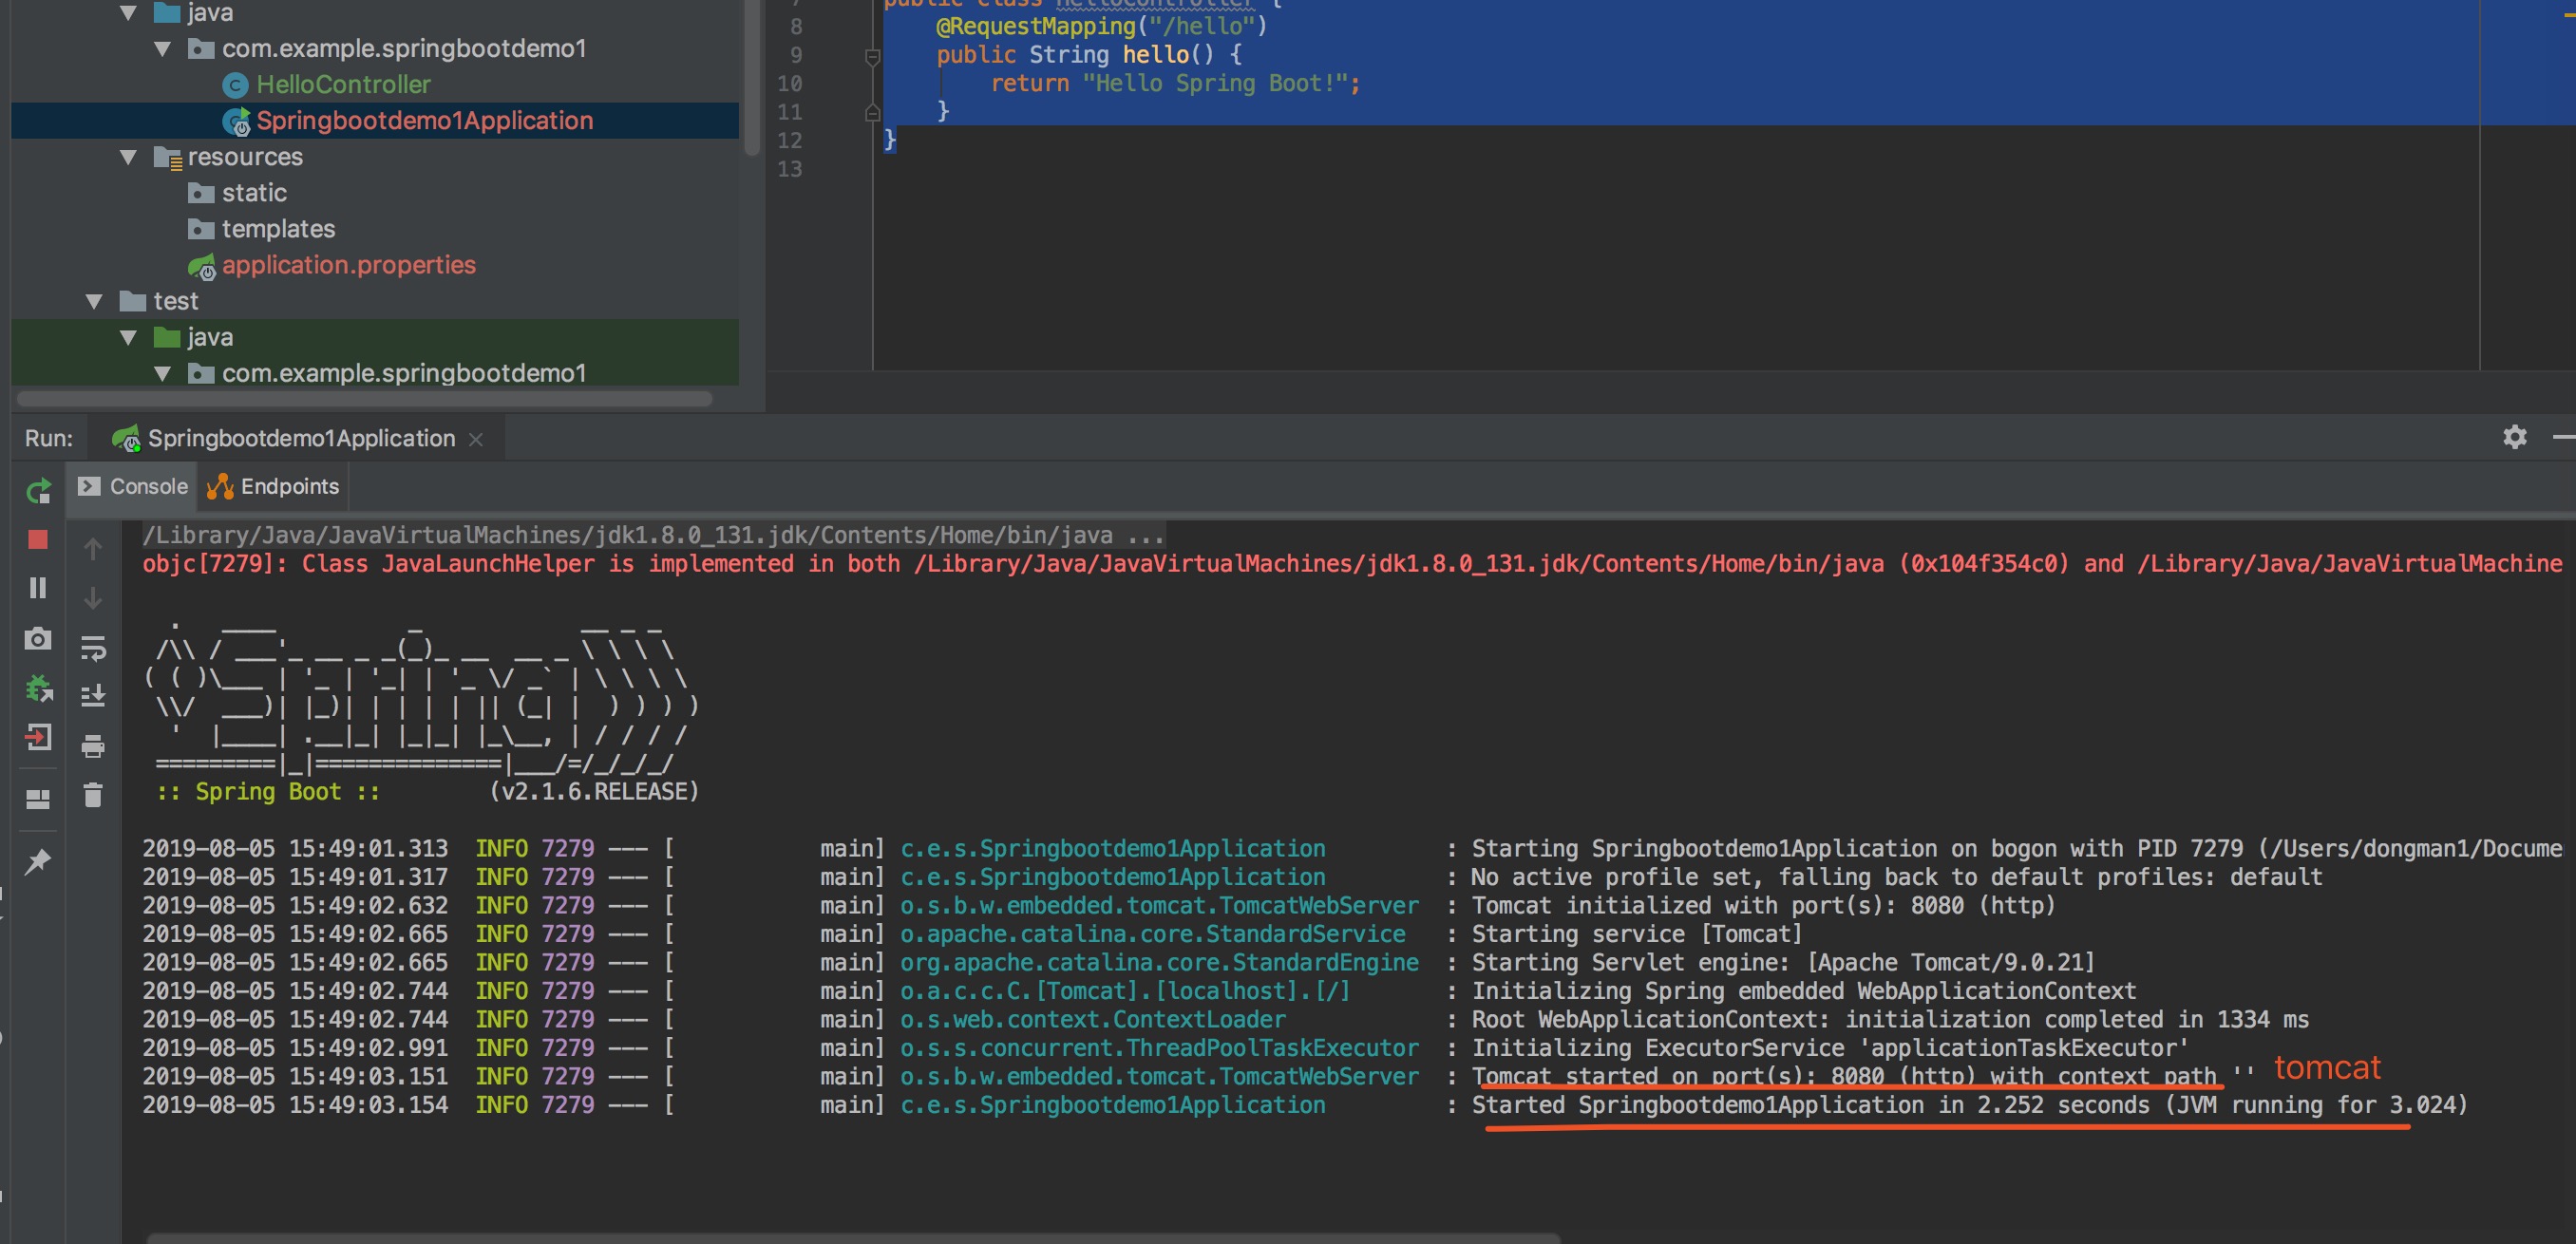 Spring Boot内部有tomcat所以直接启动Spring Boot即可内部会自动启动tomcat,看一下效果。
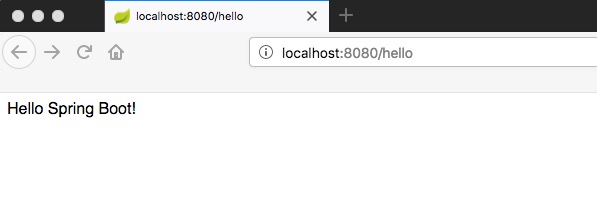
server.port=8082
server.context-path=/hello
把访问的url修改成
http://localhost:8082/hello/即可
server.port=8081
server.context-path=/hello
@PropertySource(value="classpath:application.properties",encoding = "UTF-8")
name: 我今年多大了
age: 22
和application.yml的
server:
  port: 8081
  server:
    context-path=/hello
name: 我是谁,请告诉我
age: 22
相同,两个配置文件根据自己爱好,配置其中一个即可。
举个例子:
HelloController文件中内容如下:
package com.example.springbootdemo1;

import org.springframework.beans.factory.annotation.Value;
import org.springframework.web.bind.annotation.RequestMapping;
import org.springframework.web.bind.annotation.RestController;

@RestController
public class HelloController {

//    @Value("${name}")
//    public String name;
//    @Value("${age}")
//    public Integer age;

    @Value("${content}")
    public String content;

    @RequestMapping("/hello")
    public String hello() {
//        return "Spring Boot ";
        return content;
    }

}
application.properties文件内容:
server.port=8081
server.context-path=/hello
@PropertySource(value="classpath:application.properties",encoding = "UTF-8")
name: 我今年多大了
age: 22
content: ${name}, ${age}
application.yml如果使用application.yml文件的内容需要把application.properties文件内容注释掉
server:
  port: 8081
  server:
    context-path=/hello
name: 我是谁,请告诉我
age: 22
content: ${name},${age}
使用浏览器浏览之后,两者展现内容格式一样,也可以在尝试把content注释掉,分别打印两个变量,需要在HelloController文件中内容如下:
package com.example.springbootdemo1;

import org.springframework.beans.factory.annotation.Value;
import org.springframework.web.bind.annotation.RequestMapping;
import org.springframework.web.bind.annotation.RestController;

@RestController
public class HelloController {

    @Value("${name}")
    public String name;
    @Value("${age}")
    public Integer age;

//    @Value("${content}")
//    public String content;

    @RequestMapping("/hello")
    public String hello() {
//        return "Spring Boot ";
        return name + age;
    }

}
<dependency>
    <groupId>org.springframework.boot</groupId>
    <artifactId>spring-boot-devtools</artifactId>
    <optional>true</optional> <!-- 这个需要为 true 热部署才有效 -->
</dependency>
    <dependency>
        <groupId>javax.servlet</groupId>
        <artifactId>jstl</artifactId>
    </dependency>
    <!-- Provided 编译和测试的时候使用-->

    <!-- 对jsp的支持的依赖 -->
    <dependency>
        <groupId>org.apache.tomcat.embed</groupId>
        <artifactId>tomcat-embed-jasper</artifactId>
    </dependency>
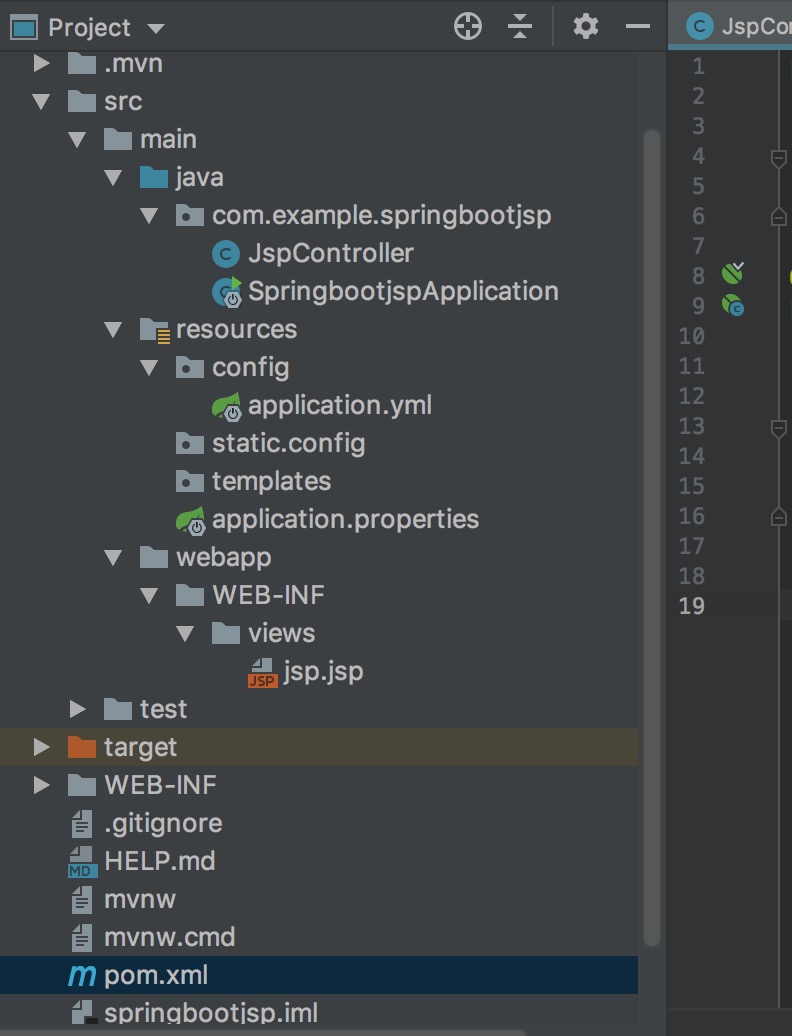
在src/main目录下创建webapp/WEB-INF/views,并在views目录下创建一个jsp文件,这里创建的jsp文件文件名需要和接口返回的字符串一样。这里使用的jsp.jsp文件
<%--
  Created by IntelliJ IDEA.
  User: wolf
  Date: 2019-08-06
  Time: 19:07
  To change this template use File | Settings | File Templates.
--%>
<%@ page contentType="text/html;charset=UTF-8" language="java" %>
<html>
<head>
    <title>Title</title>
</head>
<body>
${name}
<%--打印变量name--%>
</body>
</html>
配置接口这里选择在resources中创建config目录在config目录中增加一个application.yml文件进行配置
#接口端口
server:
  port: 8003
#  接口路径
  servlet:
    context-path: /learn

#调用jsp
spring:
  mvc:
    view:
      prefix: /WEB-INF/views/
      suffix: .jsp
创建Spring Boot入住函数在src/main/com.example.springbootjsp下创建JspController java文件
package com.example.springbootjsp;


import org.springframework.stereotype.Controller;
import org.springframework.ui.Model;
import org.springframework.web.bind.annotation.RequestMapping;

@Controller
public class JspController {


    @RequestMapping("/jsp")
    public String jsp(Model m){
        m.addAttribute("name","这是一个jsp测试也没");
        return "jsp";
    }

}
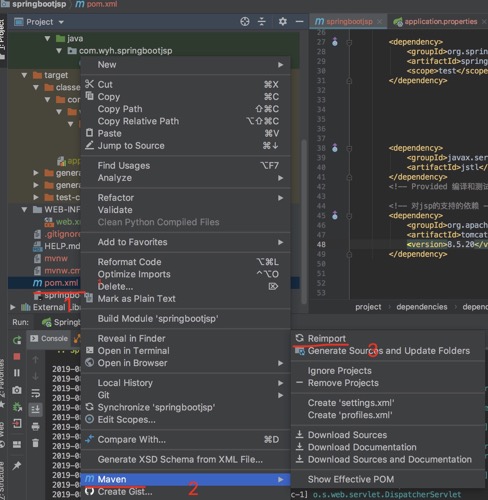
创建后需要更新一下maven,右键pom.xml---Maven---Reimport,下面是jsp项目结构:
Whitelabel Error Page

This application has no explicit mapping for /error, so you are seeing this as a fallback.
Tue Aug 06 18:46:12 CST 2019
There was an unexpected error (type=Not Found, status=404).
/learn/WEB-INF/views/hello.jsp
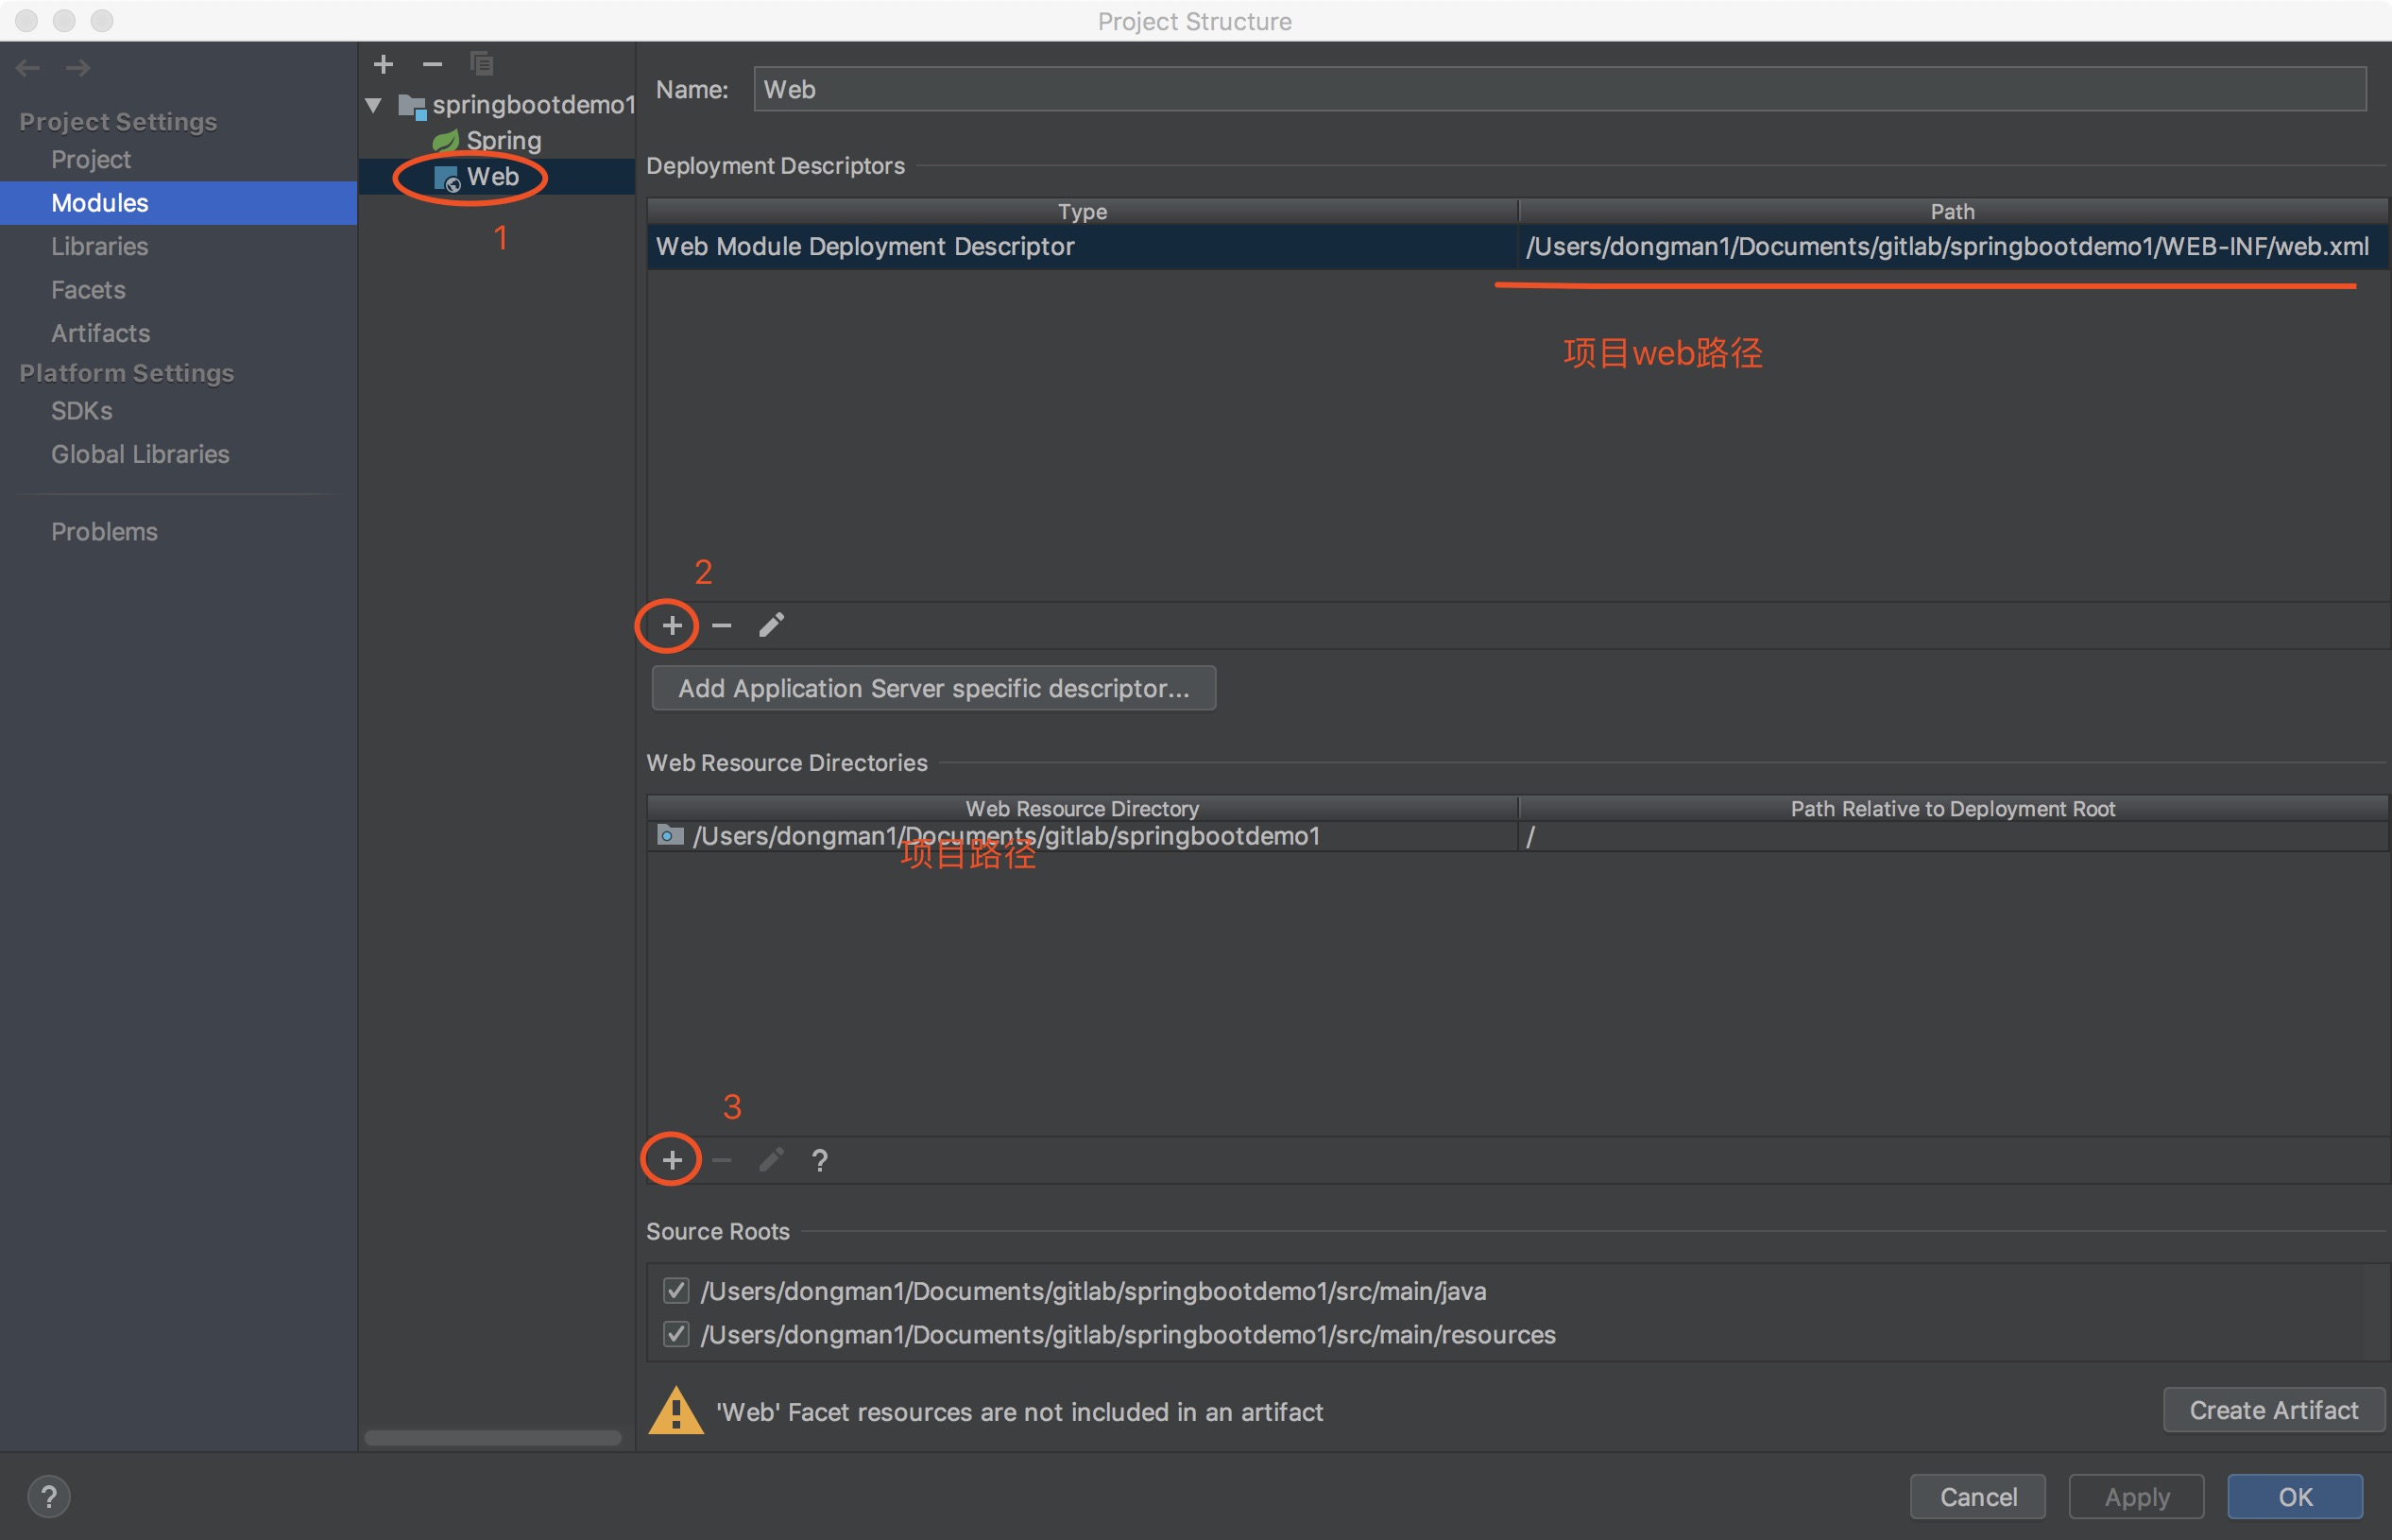
主要是路径错误了,WEB-INF/views/hello.jsp这个文件是在webapp目录下,但是webapp目录是在src/main目录下的
 IDEA 中导入的Spring Boot项目,在程序入口处右键单击没有出现run as的程序启动,主要是因为mave projects中没有加载项目,需要点击“+”号,添加项目,然后进行项目的编译打包,
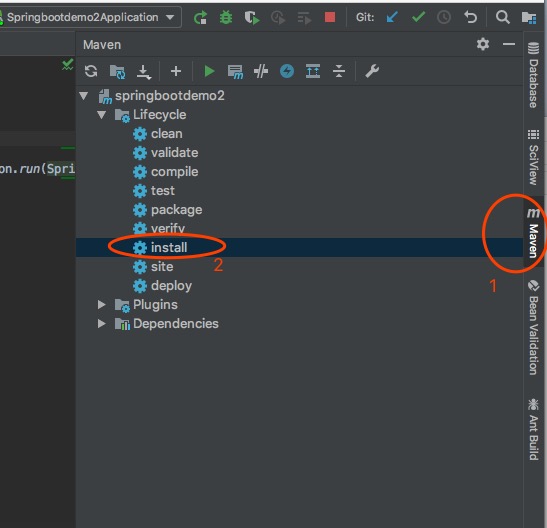
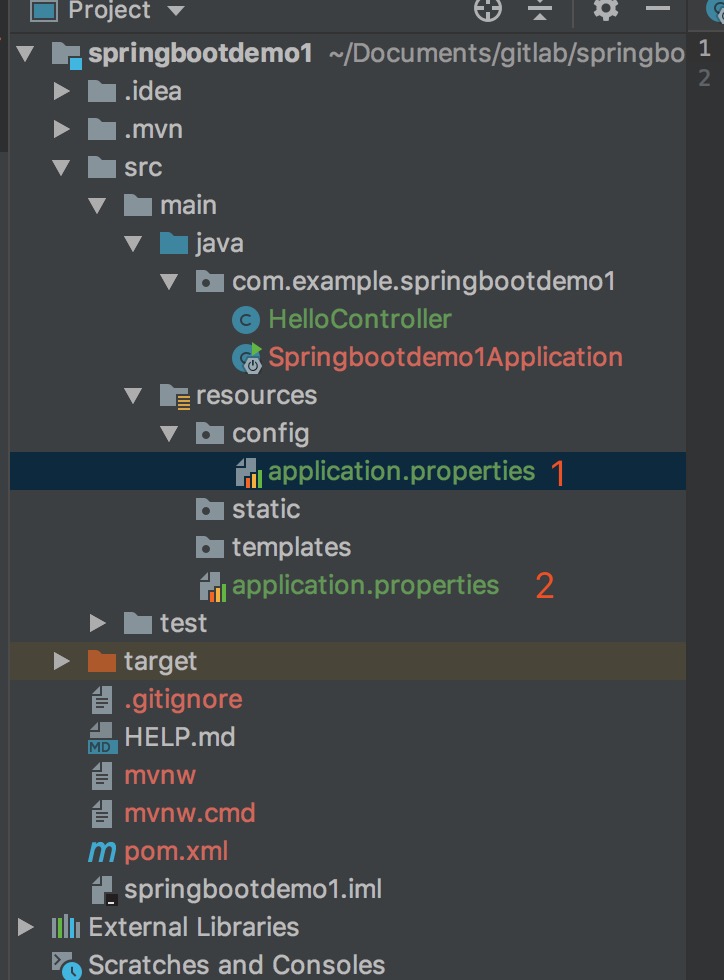 注:1的优先级大于2的优先级
日志出现下面的问题解决:
注:1的优先级大于2的优先级
日志出现下面的问题解决:
2019-08-05 16:12:03.473  INFO 7505 --- [           main] c.e.s.Springbootdemo1Application         : Started Springbootdemo1Application in 2.81 seconds (JVM running for 4.032)
2019-08-05 16:12:07.576  INFO 7505 --- [nio-8080-exec-1] o.a.c.c.C.[Tomcat].[localhost].[/]       : Initializing Spring DispatcherServlet 'dispatcherServlet'
2019-08-05 16:12:07.576  INFO 7505 --- [nio-8080-exec-1] o.s.web.servlet.DispatcherServlet        : Initializing Servlet 'dispatcherServlet'
2019-08-05 16:12:07.587  INFO 7505 --- [nio-8080-exec-1] o.s.web.servlet.DispatcherServlet        : Completed initialization in 11 ms
访问的时候出现,可以在resources目录application.properties配置文件中设置如下配置项指定启动时初始化:
spring.mvc.servlet.load-on-startup=100在application.properties中创建了中文,浏览的时候乱码解决方法: 第一种在IDEA设置中Editor--File Encodings 把Project Encoding:后面设置成UTF-8,下面的Properties Files(*。properties)设置成UTF-8,在勾上后面的[Transparent native-to-ascil conversion] 第二种在application.properties中增加[@PropertySource(value="classpath:application.properties",encoding = "UTF-8")]重启即可
一、准备工作:确认架构并下载安装包 1.1 确认目标服务器架构 在目标服务器上执行以下命令,确认系统架构: 输出 x8664:对应 amd64 架构(Intel/AMD 64位服务

1\. 环境准备 操作系统:推荐使用 Ubuntu 22.04 / Debian 12 权限:需要 root 或 sudo 权限 网络:确保服务器有公网 IP,并且 UDP 119

我的环境是这样的,在window里共享里一个目录然后需要在pod里可以读取这个目录,想过使用直接把共享目录接入到kubernetes集群里,发现,无法直接读取共享的目录,没有办法,
评论 0