
一、Amoeba 是什么
Amoeba(变形虫)项目,专注 分布式数据库 proxy 开发。座落与Client、DB Server(s)之间。对客户端透明。具有负载均衡、高可用性、sql过滤、读写分离、可路由相关的query到目标数据库、可并发请求多台数据库合并结果。
主要解决:
• 降低 数据切分带来的复杂多数据库结构
• 提供切分规则并降低 数据切分规则 给应用带来的影响
• 降低db 与客户端的连接数
• 读写分离
二、为什么要用Amoeba
目前要实现mysql的主从读写分离,主要有以下几种方案:
1、 通过程序实现,网上很多现成的代码,比较复杂,如果添加从服务器要更改多台服务器的代码。
2、 通过mysql-proxy来实现,由于mysql-proxy的主从读写分离是通过lua脚本来实现,目前lua的脚本的开发跟不上节奏,而写没有完美的现成的脚本,因此导致用于生产环境的话风险比较大,据网上很多人说mysql-proxy的性能不高。
3、 自己开发接口实现,这种方案门槛高,开发成本高,不是一般的小公司能承担得起。
4、 利用阿里巴巴的开源项目Amoeba来实现,具有负载均衡、高可用性、sql过滤、读写分离、可路由相关的query到目标数据库,并且安装配置非常简单。国产的开源软件,应该支持,目前正在使用,不发表太多结论,一切等测试完再发表结论吧,哈哈!
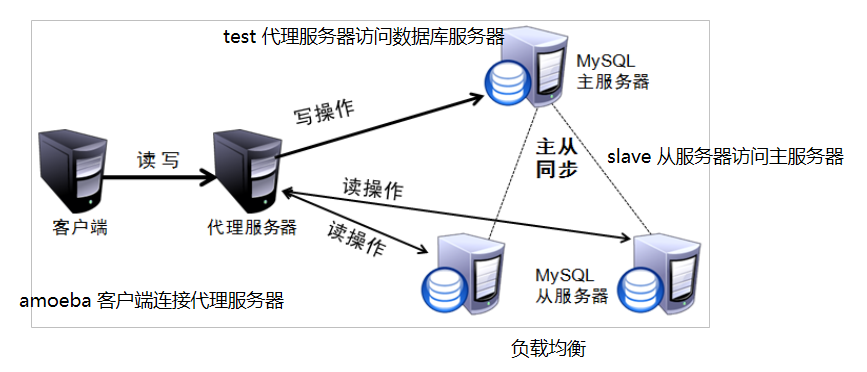
三、Amoeba+Mysql实现数据库读写分离
基本的原理:让“主”数据库处理事务增,删,改(INSERT,UPDATA,DELETE),“从”数据库处理SELECT查询操作。数据库复制被用来把事务性操作导致变更同步到集群中的从数据库
先介绍下部署环境:
 amoeba(代理服务器):192.168.220.33
 master-mysql:192.168.220.30
 slave1-mysql:192.168.220.31
 slave2-mysql:192.168.220.32
 客户机(本机 win11):192.168.220.2
客户机(本机 win11):192.168.220.2
系统:centOS 7.9
MySQL:5.7
Amoeba:3.0.5 (框架是居于java语言开发)
jdk:1.8
部署MySQL一主多从:
注:做 主从 数据库里数据最好是保持一致
1、主数据库:master-mysql
mysql> show databases;
+--------------------+
| Database           |
+--------------------+
| information_schema |
| mysql              |
| performance_schema |
| sys                |
+--------------------+
4 rows in set (0.00 sec)

mysql>
mysql> grant all on *.* to 'test'@'192.168.220.%' identified by '1234.Com'; #创建授权用户 为amoeba提供登录
Query OK, 0 rows affected, 1 warning (0.00 sec)

mysql>
mysql> grant replication slave on *.* to 'slave'@'192.168.220.%' identified by '1234.Com'; #主从模式
Query OK, 0 rows affected, 1 warning (0.00 sec)

mysql>
mysql> show master status\G;
*************************** 1. row ***************************
             File: mysql-bin.000001 #从库加入主库时 需要配置的二进制文件名
         Position: 154         # 二进制日子 从 pos 154 开始被slave
复制
备份 Binlog_Do_DB: Binlog_Ignore_DB: Executed_Gtid_Set: 1 row in set (0.00 sec) ERROR: No query specified mysql>
mysql> show databases; +--------------------+ | Database | +--------------------+ | information_schema | | mysql | | performance_schema | | sys | +--------------------+ 4 rows in set (0.00 sec) mysql> mysql> change master to master_host='192.168.220.30',master_user='slave',master_password='1234.Com',,master_log_file='mysql-bin.000001',master_log_pos=154; Query OK, 0 rows affected, 2 warnings (0.01 sec) mysql> mysql> start slave; Query OK, 0 rows affected (0.01 sec) mysql> show slave status\G; #查看从库的连接状态,I/O,SQL 都要为 YES *************************** 1. row *************************** Slave_IO_State: Connecting to master Master_Host: 192.168.220.30 Master_User: slave Master_Port: 3306 Connect_Retry: 60 Master_Log_File: mysql-bin.000001 Read_Master_Log_Pos: 154 Relay_Log_File: slave1-relay-bin.000001 Relay_Log_Pos: 4 Relay_Master_Log_File: mysql-bin.000001 Slave_IO_Running: YES Slave_SQL_Running: Yes Replicate_Do_DB: ···················· ERROR: No query specified mysql> grant all on *.* to 'test'@'192.168.220.%' identified by '1234.Com'; #创建授权用户 为amoeba提供登录 Query OK, 0 rows affected, 1 warning (0.00 sec)
3、从数据库:slave2-mysql
mysql> show databases; +--------------------+ | Database | +--------------------+ | information_schema | | mysql | | performance_schema | | sys | +--------------------+ 4 rows in set (0.00 sec) mysql> mysql> change master to master_host='192.168.220.30',master_user='slave',master_password='1234.Com',,master_log_file='mysql-bin.000001',master_log_pos=154; Query OK, 0 rows affected, 2 warnings (0.01 sec) mysql> mysql> start slave; Query OK, 0 rows affected (0.01 sec) mysql> show slave status\G; #查看从库的连接状态,I/O,SQL 都要为 YES *************************** 1. row *************************** Slave_IO_State: Connecting to master Master_Host: 192.168.220.30 Master_User: slave Master_Port: 3306 Connect_Retry: 60 Master_Log_File: mysql-bin.000001 Read_Master_Log_Pos: 154 Relay_Log_File: slave1-relay-bin.000001 Relay_Log_Pos: 4 Relay_Master_Log_File: mysql-bin.000001 Slave_IO_Running: YES Slave_SQL_Running: Yes Replicate_Do_DB: ···················· ERROR: No query specified mysql> grant all on *.* to 'test'@'192.168.220.%' identified by '1234.Com'; #创建授权用户 为amoeba提供登录 Query OK, 0 rows affected, 1 warning (0.00 sec)
4、主库测试:创建一个测试库并添加创建表和添加数据,查看从库是否同步
mysql> create database test; Query OK, 1 row affected (0.00 sec) mysql> use test; Database changed mysql> create table test (id int); Query OK, 0 rows affected (0.01 sec) mysql> insert into test values (1); Query OK, 1 row affected (0.00 sec) mysql> select * from test; +------+ | id | +------+ | 1 | +------+ 1 row in set (0.00 sec) mysql>
5、slave1 从库测试:
mysql> show databases; +--------------------+ | Database | +--------------------+ | information_schema | | mysql | | performance_schema | | sys | | test | +--------------------+ 5 rows in set (0.00 sec) mysql> select * from test.test; +------+ | id | +------+ | 1 | +------+ 1 row in set (0.00 sec) mysql>
6、slave2 从库测试:
mysql> show databases; +--------------------+ | Database | +--------------------+ | information_schema | | mysql | | performance_schema | | sys | | test | +--------------------+ 5 rows in set (0.00 sec) mysql> select * from test.test; +------+ | id | +------+ | 1 | +------+ 1 row in set (0.00 sec) mysql>
从数据库同步正常,主从数据库部署完成,接下来部署 Amoeba
*Amoeba 安装部署*
1、安装java环境
先去官网下载:http://www.oracle.com/technetwork/java/javase/downloads/jdk8-downloads-2133151.html
安装
 [root@amoeba src]# rpm -ivh jdk-8u111-linux-x64.rpm
 Preparing...                ########################################### [100%]
    1:jdk1.8.0_111           ########################################### [100%]
 Unpacking JAR files...
     tools.jar...
     plugin.jar...
     javaws.jar...
     deploy.jar...
     rt.jar...
     jsse.jar...
     charsets.jar...
     localedata.jar...
设置Java环境
[root@amoeba src]# vim /etc/profile #set java environment JAVA_HOME=/usr/java/jdk1.8.0_111 JRE_HOME=/usr/java/jdk1.8.0_111/jre CLASS_PATH=.:$JAVA_HOME/lib/dt.jar:$JAVA_HOME/lib/tools.jar:$JRE_HOME/lib PATH=$PATH:$JAVA_HOME/bin:$JRE_HOME/bin export JAVA_HOME JRE_HOME CLASS_PATH PATH[root@bogon amoeba]# source /etc/profile
测试是否安装成功
 [root@bogon src]# java -version
 java version "1.8.0_111"
 Java(TM) SE Runtime Environment (build 1.8.0_111-b14)
 Java HotSpot(TM) 64-Bit Server VM (build 25.111-b14, mixed mode)
2、安装Amoeba
可以从下载最新版本的Amoeba,我这里下载的是。Amoeba安装非常简单,直接解压即可使用,这里将Amoeba解压到/usr/local/amoeba目录下,这样就安装完成了
 [root@amoeba amoeba]# pwd
 /usr/local/amoeba
 [root@amoeba amoeba]# ll
 total 48
 drwxr-xr-x 2 root root    63 Aug 16 10:24 benchmark
 drwxr-xr-x 2 root root   131 Feb 29  2012 bin
 -rwxr-xr-x 1 root root  3976 Aug 29  2012 changelogs.txt
 drwxr-xr-x 2 root root   243 Aug 16 14:53 conf
 drwxr-xr-x 3 root root  4096 Aug 16 10:24 lib
 -rwxr-xr-x 1 root root 34520 Aug 29  2012 LICENSE.txt
 drwxr-xr-x 2 root root   133 Aug 16 10:25 logs
 -rwxr-xr-x 1 root root  2031 Aug 29  2012 README.html
 [root@amoeba amoeba]#
3.配置Amoeba(实现读写分离,两个slave“读”负载)
Amoeba的配置文件在本环境下位于:/usr/local/amoeba/conf 目录下,实现读写分离和负载 只需要 dbServers.xml和amoeba.xml 两个文件即可,下面介绍
dbServer.xml
[root@amoeba amoeba]# cd conf/ [root@amoeba conf]# ls access_list.conf amoeba.xml dbServers.xml functionMap.xml log4j.xml ruleFunctionMap.xml amoeba.dtd dbserver.dtd function.dtd log4j.dtd rule.dtd rule.xml [root@amoeba conf]# cat dbServers.xml <?xml version="1.0" encoding="gbk"?> <!DOCTYPE amoeba:dbServers SYSTEM "dbserver.dtd"> <amoeba:dbServers xmlns:amoeba="http://amoeba.meidusa.com/"> <!-- Each dbServer needs to be configured into a Pool, If you need to configure multiple dbServer with load balancing that can be simplified by the following configuration: add attribute with name virtual = "true" in dbServer, but the configuration does not allow the element with name factoryConfig such as 'multiPool' dbServer --> <dbServer name="abstractServer" abstractive="true"> <factoryConfig class="com.meidusa.amoeba.mysql.net.MysqlServerConnectionFactory"> <property name="manager">${defaultManager}</property> <property name="sendBufferSize">64</property> <property name="receiveBufferSize">128</property> <!-- mysql port --> <property name="port">3306</property> #设置Amoeba 连接数据库的端口,默认 3306 <!-- mysql schema --> <property name="schema">mysql</property> #设置 缺省的数据库,我这里使用的MySQL版本为5.7版本,默认是没有test库的,会报所以找不到默认的库,我之前搭建的MySQL版本是5.5是不需要修改的,没注意到这一点 <!-- mysql user --> <property name="user">test</property> #设置amoeba连接后端数据库服务器的账号和密码,上面已为 test 授权 和设置了密码 <!-- mysql password --> <property name="password">1234.Com</property> </factoryConfig> <poolConfig class="com.meidusa.amoeba.net.poolable.PoolableObjectPool"> <property name="maxActive">500</property> #最大连接数,默认为500 <property name="maxIdle">500</property> #最大空闲连接数 <property name="minIdle">10</property> #最新空闲连接数 <property name="minEvictableIdleTimeMillis">600000</property> <property name="timeBetweenEvictionRunsMillis">600000</property> <property name="testOnBorrow">true</property> <property name="testOnReturn">true</property> <property name="testWhileIdle">true</property> </poolConfig> </dbServer> <dbServer name="master" parent="abstractServer"> #设置一个空间名称,可任意命名,这里定义为:master,顾名思义就是为master库创建一个命名空间,后面会用到 <factoryConfig> <!-- mysql ip --> <property name="ipAddress">192.168.220.30</property> #设置 master的IP,功能可写 </factoryConfig> </dbServer> <dbServer name="slave1" parent="abstractServer"> #设置slava1 命名空间名称 <factoryConfig> <!-- mysql ip --> <property name="ipAddress">192.168.220.31</property> # 设置slave1的IP,功能可写 </factoryConfig> </dbServer> <dbServer name="slave2" parent="abstractServer"> #设置slava2 命名空间名称 <factoryConfig> <!-- mysql ip --> <property name="ipAddress">192.168.220.32</property> #设置 slave的ip,功能可写 </factoryConfig> </dbServer> <dbServer name="slaves" virtual="true"> #设置定义一个虚拟的dbserver,实际上相当于一个dbserver组,这里将可读的数据库ip统一放到一个组中,将这个组的名字命名为slaves <poolConfig class="com.meidusa.amoeba.server.MultipleServerPool"> <!-- Load balancing strategy: 1=ROUNDROBIN , 2=WEIGHTBASED , 3=HA--> <property name="loadbalance">1</property> #选择调度算法,1表示复制均衡,2表示权重,3表示HA, 这里选择1 <!-- Separated by commas,such as: server1,server2,server1 --> <property name="poolNames">slave1,slave2</property> #slave组成员,把slave1,slave2 加入成员里,可实现 “读” 负载 </poolConfig> </dbServer> </amoeba:dbServers> [root@amoeba conf]#
amoeba.xml
[root@amoeba amoeba]# cd conf/ [root@amoeba conf]# ls access_list.conf amoeba.xml dbServers.xml functionMap.xml log4j.xml ruleFunctionMap.xml amoeba.dtd dbserver.dtd function.dtd log4j.dtd rule.dtd rule.xml [root@amoeba conf]# cat amoeba.xml <?xml version="1.0" encoding="gbk"?> <!DOCTYPE amoeba:configuration SYSTEM "amoeba.dtd"> <amoeba:configuration xmlns:amoeba="http://amoeba.meidusa.com/"> <proxy> <!-- service class must implements com.meidusa.amoeba.service.Service --> <service name="Amoeba for Mysql" class="com.meidusa.amoeba.net.ServerableConnectionManager"> <!-- port --> <property name="port">8066</property> #设置amoeba 今天的端口,默认是8066 <!-- bind ipAddress --> <!-- <property name="ipAddress">127.0.0.1</property> --> <property name="manager">${clientConnectioneManager}</property> <property name="connectionFactory"> <bean class="com.meidusa.amoeba.mysql.net.MysqlClientConnectionFactory"> <property name="sendBufferSize">128</property> <property name="receiveBufferSize">64</property> </bean> </property> <property name="authenticator"> <bean class="com.meidusa.amoeba.mysql.server.MysqlClientAuthenticator"> <property name="user">amoeba</property> #提供客服端连接amoeba是需要使用设定的账号,账号密码可任意设置和数据服务器里的密码无关 <property name="password">123456</property> <property name="filter"> <bean class="com.meidusa.amoeba.server.IPAccessController"> <property name="ipFile">${amoeba.home}/conf/access_list.conf</property> </bean> </property> </bean> </property> </service> <!-- server class must implements com.meidusa.amoeba.service.Service --> <service name="Amoeba Monitor Server" class="com.meidusa.amoeba.monitor.MonitorServer"> <!-- port --> <!-- default value: random number <property name="port">9066</property> --> <!-- bind ipAddress --> <property name="ipAddress">127.0.0.1</property> <property name="daemon">true</property> <property name="manager">${clientConnectioneManager}</property> <property name="connectionFactory"> <bean class="com.meidusa.amoeba.monitor.net.MonitorClientConnectionFactory"></bean> </property> </service> <runtime class="com.meidusa.amoeba.mysql.context.MysqlRuntimeContext"> <!-- proxy server net IO Read thread size --> <property name="readThreadPoolSize">20</property> <!-- proxy server client process thread size --> <property name="clientSideThreadPoolSize">30</property> <!-- mysql server data packet process thread size --> <property name="serverSideThreadPoolSize">30</property> <!-- per connection cache prepared statement size --> <property name="statementCacheSize">500</property> <!-- query timeout( default: 60 second , TimeUnit:second) --> <property name="queryTimeout">60</property> </runtime> </proxy> <!-- Each ConnectionManager will start as thread manager responsible for the Connection IO read , Death Detection --> <connectionManagerList> <connectionManager name="clientConnectioneManager" class="com.meidusa.amoeba.net.MultiConnectionManagerWrapper"> <property name="subManagerClassName">com.meidusa.amoeba.net.ConnectionManager</property> <!-- default value is avaliable Processors <property name="processors">5</property> --> </connectionManager> <connectionManager name="defaultManager" class="com.meidusa.amoeba.net.MultiConnectionManagerWrapper"> <property name="subManagerClassName">com.meidusa.amoeba.net.AuthingableConnectionManager</property> <!-- default value is avaliable Processors <property name="processors">5</property> --> </connectionManager> </connectionManagerList> <!-- default using file loader --> <dbServerLoader class="com.meidusa.amoeba.context.DBServerConfigFileLoader"> <property name="configFile">${amoeba.home}/conf/dbServers.xml</property> </dbServerLoader> <queryRouter class="com.meidusa.amoeba.mysql.parser.MysqlQueryRouter"> <property name="ruleLoader"> <bean class="com.meidusa.amoeba.route.TableRuleFileLoader"> <property name="ruleFile">${amoeba.home}/conf/rule.xml</property> <property name="functionFile">${amoeba.home}/conf/ruleFunctionMap.xml</property> </bean> </property> <property name="sqlFunctionFile">${amoeba.home}/conf/functionMap.xml</property> <property name="LRUMapSize">1500</property> <property name="defaultPool">master</property> #设置amoeba默认是的池,这里设置为master(在dbServers.xml文件中,我们定义了一会master的空间名称以及对应的服务器IP) <property name="writePool">master</property> #设置写的池,master作为主数据库,处理的业务为 增,删,改 都是写操作,所以这设置为master <property name="readPool">slaves</property> #设置读的池 slave 作为从库,负责 查(SELECT,因为我们有两个slave,在定义命名空间时,我们配置了一个slaves组,里面有slave1,slave2两个成员,这样就可以达到 读的负载 <property name="needParse">true</property> </queryRouter> </amoeba:configuration>
3、启动Amoeba
 [root@amoeba ~]# /usr/local/amoeba/bin/launcher &
     at org.codehaus.plexus.classworlds.launcher.Launcher.launchStandard(Launcher.java:329)
     at org.codehaus.plexus.classworlds.launcher.Launcher.launch(Launcher.java:239)
     at org.codehaus.plexus.classworlds.launcher.Launcher.mainWithExitCode(Launcher.java:409)
     at org.codehaus.classworlds.Launcher.mainWithExitCode(Launcher.java:127)
     at org.codehaus.classworlds.Launcher.main(Launcher.java:110)
 Caused by: com.meidusa.toolkit.common.bean.util.InitialisationException: default pool required!,defaultPool=writedb invalid
     at com.meidusa.amoeba.route.AbstractQueryRouter.init(AbstractQueryRouter.java:469)
     at com.meidusa.amoeba.context.ProxyRuntimeContext.initAllInitialisableBeans(ProxyRuntimeContext.java:337)
     ... 11 more
  2022-8-16 18:46:37 [INFO] Project Name=Amoeba-MySQL, PID=1577 , System shutdown ....
 Java HotSpot(TM) 64-Bit Server VM warning: ignoring option PermSize=16m; support was removed in 8.0
 Java HotSpot(TM) 64-Bit Server VM warning: ignoring option MaxPermSize=96m; support was removed in 8.0
 2022-8-16 18:50:19 [INFO] Project Name=Amoeba-MySQL, PID=1602 , starting...
 log4j:WARN log4j config load completed from file:/usr/local/amoeba/conf/log4j.xml
 2022-8-16 18:50:21,668 INFO  context.MysqlRuntimeContext - Amoeba for Mysql current versoin=5.1.45-mysql-amoeba-proxy-3.0.4-BETA
 log4j:WARN ip access config load completed from file:/usr/local/amoeba/conf/access_list.conf
 2022-8-16 18:50:22,852 INFO  net.ServerableConnectionManager - Server listening on 0.0.0.0/0.0.0.0:8066.
查看端口
 [root@amoeba ~]# netstat -anpt | grep java
 tcp6       0      0 127.0.0.1:13319         :::*                    LISTEN      21350/java
 tcp6       0      0 :::8066                 :::*                    LISTEN      21350/java
4、Amoeba 登录测试(客户端-本机:win11)
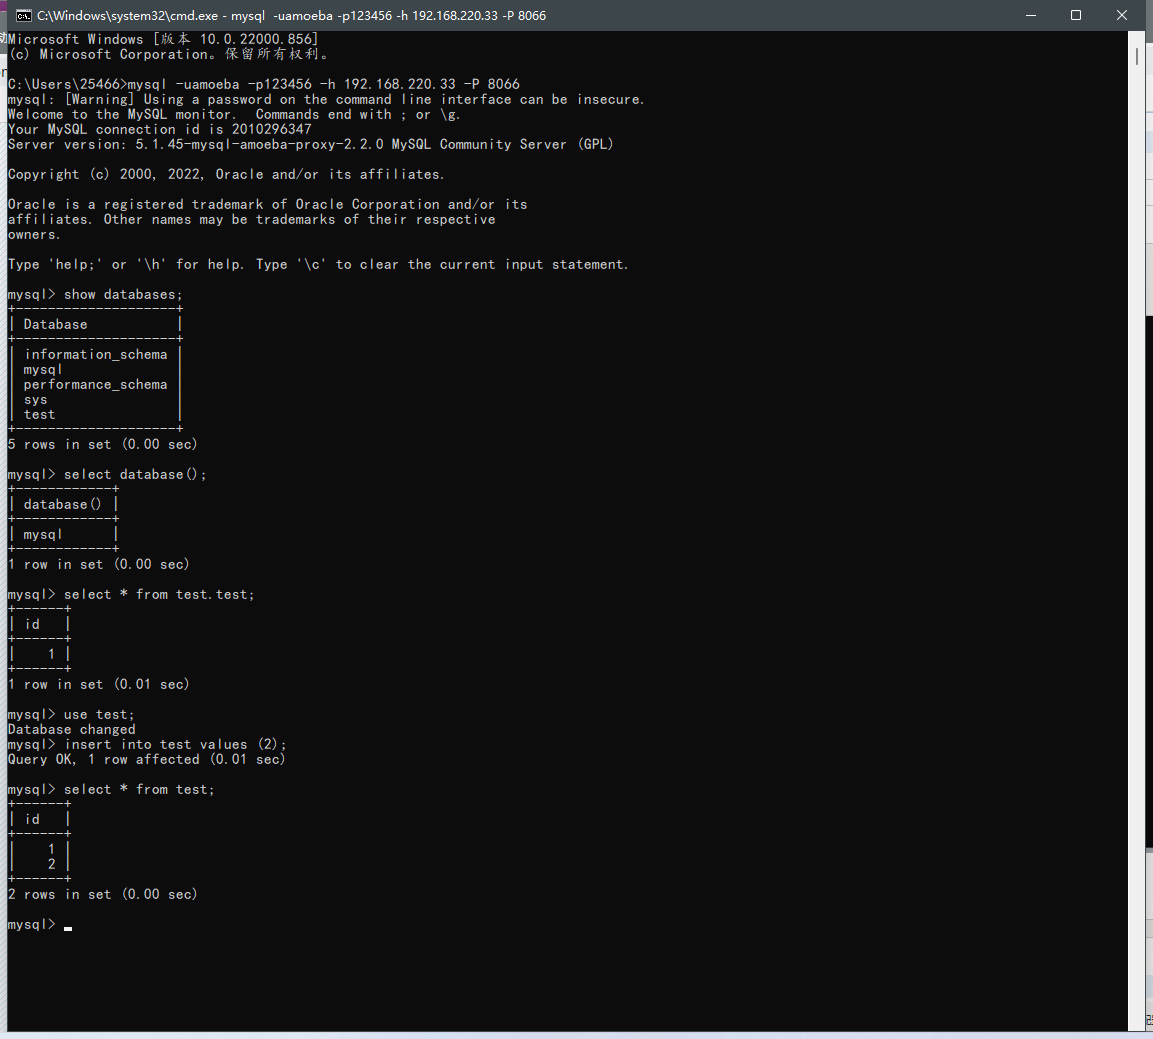
测试结果:登录后 所在的库是“mysql”库,可读取,可写入,到这里数据库读写分离部,负载部署完成!!!
下面就是读写分离的效果测试:
四、测试读写分离,负载效果
1、读写分离测试:
测试1 :mysql-master down机,写入报错,读正常
mysql-master:
[root@mysql_master ~]# systemctl stop mysqld
客服端:
mysql> select * from test; #可正常查询 +------+ | id | +------+ | 1 | | 2 | +------+ 2 rows in set (0.00 sec) mysql> mysql> insert into test values (3); ERROR 2013 (HY000): Lost connection to MySQL server during query #写入失败
测试2 :关闭两台slave,读取失败,插入成功
mysql-master
[root@mysql_master ~]# systemctl start mysqld
mysql-slave1
[root@slave1 ~]# systemctl stop mysqld
mysql-slave2
[root@slave2 ~]# systemctl stop mysqld
客服端:
mysql> insert into test values (3); Query OK, 1 row affected (0.00 sec) mysql> select * from test; ERROR 2013 (HY000): Lost connection to MySQL server during query #查询失败 mysql>
测试3:开启slava1,save2上的mysql,查看数据是否自动同步
mysql-slave1
[root@slave1 ~]# systemctl start mysqld
mysql-slave2
[root@slave2 ~]# systemctl start mysqld
客服端:
mysql> select * from test; +------+ | id | +------+ | 1 | | 2 | | 3 | +------+ 4 rows in set (0.00 sec) mysql> mysql> insert into test values (4); Query OK, 1 row affected (0.00 sec) mysql> select * from test; +------+ | id | +------+ | 1 | | 2 | | 3 | | 4 | +------+ 5 rows in set (0.00 sec) mysql>
读写分离测试完毕!!!
2、slave “读” 负载测试:
mysql-slave1:在test表插入值:100
[root@slave1 ~]# mysql -uroot -p Enter password: mysql> mysql> select * from test; +------+ | id | +------+ | 1 | | 2 | | 3 | | 4 | +------+ 4 rows in set (0.00 sec) mysql> insert into test values (100); Query OK, 1 row affected (0.00 sec) mysql> select * from test; +------+ | id | +------+ | 1 | | 2 | | 3 | | 4 | | 100 | +------+ 5 rows in set (0.00 sec) mysql>
mysql-slave2:在test表插入值:200
[root@slave2 ~]# mysql -uroot -p Enter password: mysql> mysql> select * from test; +------+ | id | +------+ | 1 | | 2 | | 3 | | 4 | +------+ 4 rows in set (0.00 sec) mysql> insert into test values (200); Query OK, 1 row affected (0.00 sec) mysql> select * from test; +------+ | id | +------+ | 1 | | 2 | | 3 | | 4 | | 200 | +------+ 5 rows in set (0.00 sec) mysql>
客服端:
mysql> select * from test; +------+ | id | +------+ | 1 | | 2 | | 3 | | 4 | | 200 | +------+ 5 rows in set (0.00 sec) mysql> select * from test; +------+ | id | +------+ | 1 | | 2 | | 3 | | 4 | | 100 | +------+ 5 rows in set (0.00 sec) mysql> select * from test; +------+ | id | +------+ | 1 | | 2 | | 3 | | 4 | | 200 | +------+ 5 rows in set (0.00 sec) mysql> select * from test; +------+ | id | +------+ | 1 | | 2 | | 3 | | 4 | | 100 | +------+ 5 rows in set (0.00 sec) mysql>
分别在 slave1,slava2 上对test表插入不同的数据,通过客户端查询 会发现,每一次查询和上一次不同,这里就是完全体系了 “读 ”负载的功能,
您可以选择一种方式赞助本站
支付宝扫一扫赞助
微信钱包扫描赞助
赏