
https://www.wulaoer.org/?p=2714,如果使用openebs做数据持久化就直接在宿主机上使用宿主机的磁盘做持久化,可以直接部署openebs即可。
 #使用Operator运行OpenEBS服务
 wget https://raw.githubusercontent.com/openebs/openebs/master/k8s/openebs-operator.yaml
 kubectl apply -f openebs-operator.yaml
 #使用默认或自定义的storageclass:
 wget https://raw.githubusercontent.com/openebs/openebs/master/k8s/openebs-storageclasses.yaml
 kubectl apply -f openebs-storageclasses.yaml
因为我们要求Elasticsearch使用安全认证,所以我们需要给集群先创建证书,为了方便所有集群可以共用,然后把证书信息加入到集群。
 #创建证书
 [root@k8s-master Elasticsearch]# docker run --name elastic-certs -i -w /tmp docker.elastic.co/elasticsearch/elasticsearch:7.17.6 /bin/sh -c \
     "elasticsearch-certutil ca --out /tmp/es-ca.p12 --pass '' && \
     elasticsearch-certutil cert --name security-master --dns \
     security-master --ca /tmp/es-ca.p12 --pass '' --ca-pass '' --out /tmp/elastic-certificates.p12"
   This tool assists you in the generation of X.509 certificates and certificate
   signing requests for use with SSL/TLS in the Elastic stack.

   The 'ca' mode generates a new 'certificate authority'
   This will create a new X.509 certificate and private key that can be used
   to sign certificate when running in 'cert' mode.

   Use the 'ca-dn' option if you wish to configure the 'distinguished name'
   of the certificate authority

   By default the 'ca' mode produces a single PKCS#12 output file which holds:
       * The CA certificate
       * The CA's private key

   If you elect to generate PEM format certificates (the -pem option), then the output will
   be a zip file containing individual files for the CA certificate and private key

   This tool assists you in the generation of X.509 certificates and certificate
   signing requests for use with SSL/TLS in the Elastic stack.

   The 'cert' mode generates X.509 certificate and private keys.
       * By default, this generates a single certificate and key for use
          on a single instance.
       * The '-multiple' option will prompt you to enter details for multiple
          instances and will generate a certificate and key for each one
       * The '-in' option allows for the certificate generation to be automated by describing
          the details of each instance in a YAML file

       * An instance is any piece of the Elastic Stack that requires an SSL certificate.
         Depending on your configuration, Elasticsearch, Logstash, Kibana, and Beats
         may all require a certificate and private key.
       * The minimum required value for each instance is a name. This can simply be the
         hostname, which will be used as the Common Name of the certificate. A full
         distinguished name may also be used.
       * A filename value may be required for each instance. This is necessary when the
         name would result in an invalid file or directory name. The name provided here
         is used as the directory name (within the zip) and the prefix for the key and
         certificate files. The filename is required if you are prompted and the name
         is not displayed in the prompt.
       * IP addresses and DNS names are optional. Multiple values can be specified as a
         comma separated string. If no IP addresses or DNS names are provided, you may
         disable hostname verification in your SSL configuration.

       * All certificates generated by this tool will be signed by a certificate authority (CA)
         unless the --self-signed command line option is specified.
         The tool can automatically generate a new CA for you, or you can provide your own with
         the --ca or --ca-cert command line options.

   By default the 'cert' mode produces a single PKCS#12 output file which holds:
       * The instance certificate
       * The private key for the instance certificate
       * The CA certificate

   If you specify any of the following options:
       * -pem (PEM formatted output)
       * -keep-ca-key (retain generated CA key)
       * -multiple (generate multiple certificates)
       * -in (generate certificates from an input file)
   then the output will be be a zip file containing individual certificate/key files


   Certificates written to /tmp/elastic-certificates.p12

   This file should be properly secured as it contains the private key for
   your instance.

   This file is a self contained file and can be copied and used 'as is'
   For each Elastic product that you wish to configure, you should copy
   this '.p12' file to the relevant configuration directory
   and then follow the SSL configuration instructions in the product guide.

   For client applications, you may only need to copy the CA certificate and
   configure the client to trust this certificate.
生成的证书在容器里,我们需要把容器启动起来,然后从容器里copy出来,方便后面在集群里创secret里,因为创建证书的机器和连接k8s的节点不是一个机器,所以需要copy一下,如果是就不需要了,看自己情况决定。
[root@cmp-k8s-dev-master01 kube-elasticsearch]# docker cp elastic-certs:/tmp/elastic-certificates.p12 ./
创建ssl证书要使用的secret
[root@k8s-master Elasticsearch]# kubectl -n wulaoer create secret generic elastic-certificates --from-file=./elastic-certificates.p12
创建Elasticsearch集群
 [root@k8s-master Elasticsearch]# cat 1-kube-elasticsearch-master-deploy.yaml
 apiVersion: apps/v1
 kind: StatefulSet
 metadata:
   name: elasticsearch-master
   labels:
     app: elasticsearch
     role: master
 spec:
   serviceName: elasticsearch-master
   replicas: 3
   selector:
     matchLabels:
       app: elasticsearch
       role: master
   template:
     metadata:
       labels:
         app: elasticsearch
         role: master
     spec:
       containers:
         - name: elasticsearch
           image: elasticsearch:7.17.10
           command: ["bash", "-c", "ulimit -l unlimited && sysctl -w vm.max_map_count=262144 && chown -R elasticsearch:elasticsearch /usr/share/elasticsearch/data && exec su elasticsearch docker-entrypoint.sh"]
           ports:
             - containerPort: 9200
               name: http
             - containerPort: 9300
               name: transport
           env:
             - name: discovery.seed_hosts
               value: "elasticsearch-master-0.elasticsearch-master,elasticsearch-master-1.elasticsearch-master,elasticsearch-master-2.elasticsearch-master"
             - name: cluster.initial_master_nodes
               value: "elasticsearch-master-0,elasticsearch-master-1,elasticsearch-master-2"
             - name: ES_JAVA_OPTS
               value: -Xms512m -Xmx512m
             - name: node.master
               value: "true"
             - name: node.ingest
               value: "true"
             - name: node.data
               value: "true"
             - name: cluster.name
               value: "elasticsearch"
             - name: node.name
               valueFrom:
                 fieldRef:
                   fieldPath: metadata.name
             - name: xpack.security.enabled
               value: "true"
             - name: xpack.security.transport.ssl.enabled
               value: "true"
             - name: xpack.monitoring.collection.enabled
               value: "true"
             - name: xpack.security.transport.ssl.verification_mode
               value: "certificate"
             - name: xpack.security.transport.ssl.keystore.path
               value: "/usr/share/elasticsearch/config/elastic-certificates.p12"
             - name: xpack.security.transport.ssl.truststore.path
               value: "/usr/share/elasticsearch/config/elastic-certificates.p12"
           volumeMounts:
            - mountPath: /usr/share/elasticsearch/data
              name: elasticsearch-pv-master
            - name: elastic-certificates
              readOnly: true
              mountPath: "/usr/share/elasticsearch/config/elastic-certificates.p12"
              subPath: elastic-certificates.p12
            - mountPath: /etc/localtime
              name: localtime
           securityContext:
             privileged: true
       volumes:
       - name: elastic-certificates
         secret:
           secretName: elastic-certificates
       - hostPath:
           path: /etc/localtime
         name: localtime
       imagePullSecrets:
         - name: eft-image-auth
   volumeClaimTemplates:
   - metadata:
       name: elasticsearch-pv-master
     spec:
       accessModes: [ "ReadWriteOnce" ]
       storageClassName: "nfs-storage"
       resources:
         requests:
           storage: 10Gi
 ---
 apiVersion: v1
 kind: Service
 metadata:
   name: elasticsearch-master
   labels:
     app: elasticsearch
     role: master
 spec:
   selector:
     app: elasticsearch
     role: master
   type: ClusterIP
   ports:
   - port: 9200
配置Elasticsearch集群密码并在终端打印
#自动生成随机密码 [root@k8s-master Elasticsearch]# kubectl -n wulaoer exec -it $(kubectl -n wulaoer get pods | grep elasticsearch-master | sed -n 1p | awk '{print $1}') -- bin/elasticsearch-setup-passwords auto -b Changed password for user apm_system PASSWORD apm_system = hdWQq2HYWHLrZVpvm3Q5 Changed password for user kibana_system PASSWORD kibana_system = Tt0HWHQTvh9qu2SNNBx5 Changed password for user kibana PASSWORD kibana = Tt0HWHQTvh9qu2SNNBx5 Changed password for user logstash_system PASSWORD logstash_system = K9opGCJq3CI9D2VPDmmv Changed password for user beats_system PASSWORD beats_system = C5j1ESQYVN86cbs2BuQF Changed password for user remote_monitoring_user PASSWORD remote_monitoring_user = oKeOkLsghK6NElcDxxOh Changed password for user elastic PASSWORD elastic = GIoaQ45nihQ9ECrWdA99 #生成固定密码 [root@k8s-master Elasticsearch]# kubectl -n wulaoer exec -it $(kubectl -n wulaoer get pods | grep elasticsearch-master | sed -n 1p | awk '{print $1}') -- bin/elasticsearch-setup-passwords interactive Initiating the setup of passwords for reserved users elastic,apm_system,kibana,kibana_system,logstash_system,beats_system,remote_monitoring_user. You will be prompted to enter passwords as the process progresses. Please confirm that you would like to continue [y/N]y Enter password for [elastic]: Reenter password for [elastic]: Enter password for [apm_system]: Reenter password for [apm_system]: Enter password for [kibana_system]: Reenter password for [kibana_system]: Enter password for [logstash_system]: Reenter password for [logstash_system]: Enter password for [beats_system]: Reenter password for [beats_system]: Enter password for [remote_monitoring_user]: Reenter password for [remote_monitoring_user]: Changed password for user [apm_system] Changed password for user [kibana_system] Changed password for user [kibana] Changed password for user [logstash_system] Changed password for user [beats_system] Changed password for user [remote_monitoring_user] Changed password for user [elastic]
创建ES集群密码后,给kibana创建访问密钥。
 [root@k8s-master Elasticsearch]# cat 2-kube-elasticsearch-kibana-configmap.yaml
 apiVersion: v1
 kind: ConfigMap
 metadata:
   name: kibana-config
   labels:
     app: kibana
 data:
   kibana.yml: |-
     server.host: 0.0.0.0
     i18n.locale: "zh-CN"
     elasticsearch:
       hosts: ${ELASTICSEARCH_HOSTS}
       username: ${ELASTICSEARCH_USER}
       password: ${ELASTICSEARCH_PASSWORD}
 ---
 kind: Secret
 apiVersion: v1
 metadata:
   name: elasticsearch-password
 data:
   password: GIoaQ45nihQ9ECrWdA99
 type: Opaque
创建kibana展示ES内容,这里要注意
 [root@k8s-master Elasticsearch]# cat 3-kube-elasticsearch-kibana-deploy.yaml
 apiVersion: apps/v1
 kind: Deployment
 metadata:
   labels:
     app: kibana
   name: kibana
 spec:
   replicas: 1
   revisionHistoryLimit: 10
   selector:
     matchLabels:
       app: kibana
   template:
     metadata:
       labels:
         app: kibana
     spec:
       containers:
         - name: kibana
           image: kibana:7.17.14
           ports:
             - containerPort: 5601
               protocol: TCP
           env:
             - name: SERVER_PUBLICBASEURL
               value: "http://0.0.0.0:5601"
             - name: I18N.LOCALE
               value: zh-CN
             - name: ELASTICSEARCH_HOSTS
               value: "http://elasticsearch-master:9200"
             - name: ELASTICSEARCH_USER
               value: "elastic"
             - name: ELASTICSEARCH_PASSWORD
               valueFrom:
                 secretKeyRef:
                   name: elasticsearch-password
                   key: password
             - name: xpack.encryptedSavedObjects.encryptionKey
               value: "min-32-byte-long-strong-encryption-key"
           volumeMounts:
           - name: kibana-config
             mountPath: /usr/share/kibana/config/kibana.yml
             readOnly: true
             subPath: kibana.yml
           - mountPath: /etc/localtime
             name: localtime
       volumes:
       - name: kibana-config
         configMap:
           name: kibana-config
       - hostPath:
           path: /etc/localtime
         name: localtime
 ---
 kind: Service
 apiVersion: v1
 metadata:
   labels:
     app: kibana
   name: kibana-service
 spec:
   ports:
   - port: 5601
     targetPort: 5601
   type: ClusterIP
   selector:
     app: kibana
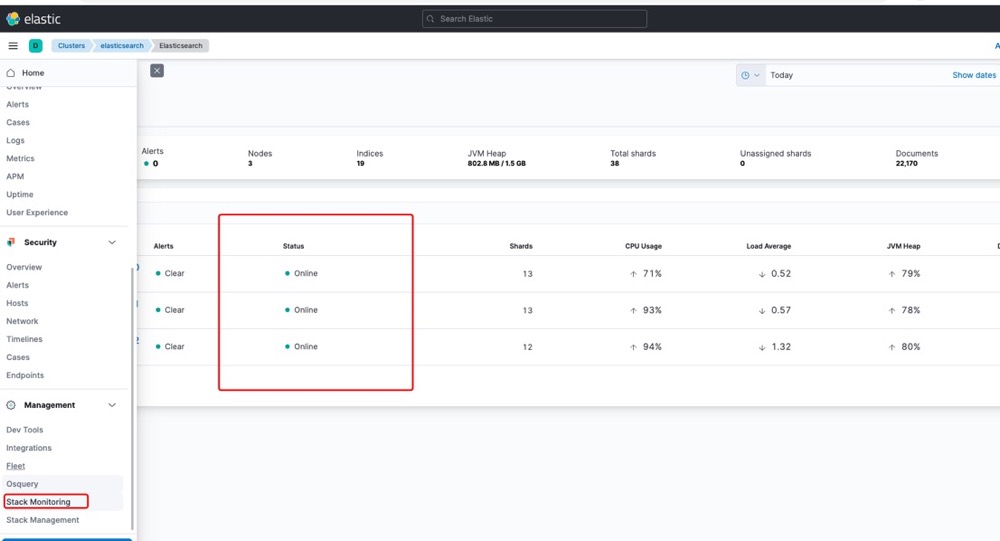
到此集群部署完成,下面看验证一下集群是否正常。通过nodeport的方式访问kibana访问ES内容
您可以选择一种方式赞助本站
支付宝扫一扫赞助
微信钱包扫描赞助
赏