
环境
| 主机名 | IP | 角色 |
|---|---|---|
| server07 | 10.211.55.142 | pinpoint server |
| server08 | 10.211.55.143 | pinpoint agent |
安装环境
需要的包都已经下载下来了,传到了百度网盘里,有需要自取。链接: https://pan.baidu.com/s/1Wo5mh2dS3Nyk-R5PB11EIQ 提取码: y6ht 我已经把文件传到了虚拟机上,看一下:
[root@server07 pinpoint]# ll
总用量 384252
-rw-r--r--. 1 root root  10305939 1月  10 11:23 apache-tomcat-8.5.50.tar.gz
-rw-r--r--. 1 root root 118311464 1月  10 14:46 hbase-1.4.12-bin.tar.gz
-rw-r--r--. 1 root root     15763 1月  10 16:38 hbase-create.hbase
-rw-r--r--. 1 root root 194151339 1月  10 12:02 jdk-8u231-linux-x64.tar.gz
-rw-r--r--. 1 root root  16593695 1月  10 10:10 pinpoint-agent-1.8.5.tar.gz
-rw-r--r--. 1 root root  62750331 1月  10 10:12 pinpoint-collector-1.8.5.war
-rw-r--r--. 1 root root  97435261 1月  10 10:14 pinpoint-web-1.8.5.war
下面我先安装jdk和tomcat,因为安装方法前面已经提到了,这里就不多叙述了,直接把安装方法抛出来,自己看一下,如果不太懂可以参考这里:https://www.wulaoer.org/?p=204
[root@server07 pinpoint]# tar -zxf jdk-8u231-linux-x64.tar.gz
[root@server07 pinpoint]# mkdir /usr/local/jvm
[root@server07 pinpoint]# mv jdk1.8.0_231 /usr/local/jvm/jdk1.8
[root@server07 pinpoint]# vim /etc/profile
...........................................
export JAVA_HOME=/usr/local/jdk
export PATH=$PATH:$JAVA_HOME/bin:$PATH
export CLASSPATH=.:$JAVA_HOME/lib/dt.jar:$JAVA_HOME/lib/tools.jar
export JRE_HOME=$JAVA_HOME/jre
[root@server07 pinpoint]# source /etc/profile
[root@server07 pinpoint]# tar -zxf apache-tomcat-8.5.50.tar.gz
[root@server07 pinpoint]# mv apache-tomcat-8.5.50 /usr/local/tomcat8.5
[root@server07 pinpoint]# cd /usr/local/tomcat8.5/
[root@server07 tomcat8.5]# ./bin/startup.sh
Using CATALINA_BASE:   /usr/local/tomcat8.5
Using CATALINA_HOME:   /usr/local/tomcat8.5
Using CATALINA_TMPDIR: /usr/local/tomcat8.5/temp
Using JRE_HOME:        /usr/local/jvm/jdk1.8/jre
Using CLASSPATH:       /usr/local/tomcat8.5/bin/bootstrap.jar:/usr/local/tomcat8.5/bin/tomcat-juli.jar
Tomcat started.
[root@server07 tomcat]# systemctl stop firewalld
[root@server07 tomcat]# systemctl disable firewalld
Removed symlink /etc/systemd/system/multi-user.target.wants/firewalld.service.
Removed symlink /etc/systemd/system/dbus-org.fedoraproject.FirewallD1.service.
[root@server07 tomcat8.5]# curl -I -m 10 -o /dev/null -s -w %{http_code}  10.211.55.142:8080
200[root@server07 tomcat8.5]#
至此,jdk,tomcat已经部署完成,后面就开始配置pinpoint服务,先安装Hbase服务,存储pinpoint采集的数据。
Hbase服务
如果我们使用监控,建议使用hbase集群存储,这里只是测试,使用habse进出存储pinpoint采集的数据,所以先把hbase服务搭建起来,先下载并解压以及配置jdk
[root@server07 pinpoint]# tar -zxf hbase-1.4.12-bin.tar.gz
[root@server07 pinpoint]# mv hbase-1.4.12 /usr/local/hbase
[root@server07 pinpoint]# cd /usr/local/hbase/
[root@server07 hbase]# vim conf/hbase-env.sh
..............................................
# The java implementation to use.  Java 1.7+ required.
# export JAVA_HOME=/usr/java/jdk1.6.0/
export JAVA_HOME=/usr/local/jdk
..................................................
[root@server07 hbase]# mkdir data/zookeeper -p
[root@server07 hbase]# vim conf/hbase-site.xml
<?xml version="1.0"?>
<?xml-stylesheet type="text/xsl" href="configuration.xsl"?>
<!--
/**
 *
 * Licensed to the Apache Software Foundation (ASF) under one
 * or more contributor license agreements.  See the NOTICE file
 * distributed with this work for additional information
 * regarding copyright ownership.  The ASF licenses this file
 * to you under the Apache License, Version 2.0 (the
 * "License"); you may not use this file except in compliance
 * with the License.  You may obtain a copy of the License at
 *
 *     http://www.apache.org/licenses/LICENSE-2.0
 *
 * Unless required by applicable law or agreed to in writing, software
 * distributed under the License is distributed on an "AS IS" BASIS,
 * WITHOUT WARRANTIES OR CONDITIONS OF ANY KIND, either express or implied.
 * See the License for the specific language governing permissions and
 * limitations under the License.
 */
-->
<configuration>
		<property>
				<name>hbase.rootdir</name>
				<value>file:///usr/local/hbase/data</value>
		</property>
		<property>
				<name>hbase.zookeeper.property.dataDir</name>
				<value>/usr/local/hbase/data/zookeeper</value>
		</property>
		<property>
		 <name>hbase.zookeeper.property.clientPort</name>
		 <value>2181</value>
		 <description>Property from ZooKeeper'sconfig zoo.cfg. The port at which the clients will connect.
		 </description>
		</property>
		<!-- false是单机模式,true是分布式模式  -->
		<property>
		 <name>hbase.cluster.distributed</name>
		 <value>false</value>
		</property>

</configuration>
[root@server07 hbase]# ./bin/start-hbase.sh
running master, logging to /usr/local/hbase/bin/../logs/hbase-root-master-server07.out
Java HotSpot(TM) 64-Bit Server VM warning: ignoring option PermSize=128m; support was removed in 8.0
Java HotSpot(TM) 64-Bit Server VM warning: ignoring option MaxPermSize=128m; support was removed in 8.0
[root@server07 hbase]# jps
1969 HMaster
1772 Bootstrap
2079 Jps
创建好了hbase,下面初始化一下hbase
[root@server07 hbase]# ./bin/hbase shell /root/pinpoint/hbase-create.hbase
2020-01-10 16:56:08,345 WARN  [main] util.NativeCodeLoader: Unable to load native-hadoop library for your platform... using builtin-java classes where applicable
0 row(s) in 2.9450 seconds

0 row(s) in 4.4370 seconds

0 row(s) in 4.3780 seconds

0 row(s) in 1.3190 seconds

0 row(s) in 1.2960 seconds

0 row(s) in 1.2920 seconds

0 row(s) in 1.3240 seconds

0 row(s) in 1.3470 seconds

0 row(s) in 1.3280 seconds

0 row(s) in 8.4430 seconds

0 row(s) in 2.3820 seconds

0 row(s) in 1.3530 seconds

0 row(s) in 1.3080 seconds

0 row(s) in 1.2660 seconds

0 row(s) in 1.3010 seconds

TABLE
AgentEvent
AgentInfo
AgentLifeCycle
AgentStatV2
ApiMetaData
ApplicationIndex
ApplicationMapStatisticsCallee_Ver2
ApplicationMapStatisticsCaller_Ver2
ApplicationMapStatisticsSelf_Ver2
ApplicationStatAggre
ApplicationTraceIndex
HostApplicationMap_Ver2
SqlMetaData_Ver2
StringMetaData
TraceV2
15 row(s) in 0.0470 seconds
hbase基本服务搭建好了,下面把pinpoint服务解压一下,然后放到tomcat指定的路径下。
配置pinpoint服务
首先把tomcat的默认信息删除,然后把pinpoint的前端页面copy进去,这样就可以可以使用直接流量pinpoint的前端信息了。
[root@server07 pinpoint]# yum -y install unzip
[root@server07 pinpoint]# rm -rf /usr/local/tomcat8.5/webapps/ROOT/*
[root@server07 pinpoint]# unzip pinpoint-web-1.8.5.war -d /usr/local/tomcat8.5/webapps/ROOT/
[root@server07 pinpoint]# cp pinpoint-collector-1.8.5.war /usr/local/tomcat8.5/webapps/
这里需要注意,因为我的hbase和pinpoint安装在一台机器上,而且pinpoint默认设置了连接hbase的信息,如果分开安装,需要单独设置一下pinpoint的信息
[root@server07 pinpoint]# cd/usr/local/tomcat8.5/webapps
[root@server07 webapps]# ll
总用量 61284
drwxr-x---. 15 root root     4096 1月  11 14:12 docs
drwxr-x---.  6 root root       83 1月  11 14:12 examples
drwxr-x---.  5 root root       87 1月  11 14:12 host-manager
drwxr-x---.  5 root root      103 1月  11 14:12 manager
drwxr-x---.  5 root root       52 1月  11 14:38 pinpoint-collector-1.8.5
-rw-r--r--.  1 root root 62750331 1月  11 14:38 pinpoint-collector-1.8.5.war
drwxr-x---. 14 root root      268 1月  11 14:39 ROOT
这里会发现copy过来的pinpoint-collector-1.8.5.war文件自动解压完成。
[root@server07 webapps]# vim pinpoint-collector-1.8.5/WEB-INF/classes/hbase.properties
hbase.client.host=localhost
hbase.client.port=2181
..............................................................
[root@server07 webapps]# vim ROOT/WEB-INF/classes/hbase.properties
hbase.client.host=localhost
hbase.client.port=2181
.....................................................................
如果hbase单独安装,把localhost修改一下hbase的ip即可,现在整个服务已经安装完成,下面安装客户端。
配置pinpoint客户端
首先在客户端上安装jdk和tomcat,可以参考上面的信息,我把基本信息已经copy到server08上,下面设置基础环境。
[root@server08 pinpoint]# tar -zxf jdk-8u231-linux-x64.tar.gz
[root@server08 pinpoint]# mkdir /usr/local/jvm
[root@server08 pinpoint]# mv jdk1.8.0_231 /usr/local/jvm/jdk1.8
[root@server08 pinpoint]# vim /etc/profile
...........................................
export JAVA_HOME=/usr/local/jdk
export PATH=$PATH:$JAVA_HOME/bin:$PATH
export CLASSPATH=.:$JAVA_HOME/lib/dt.jar:$JAVA_HOME/lib/tools.jar
export JRE_HOME=$JAVA_HOME/jre
[root@server08 pinpoint]# source /etc/profile
[root@server08 pinpoint]# tar -zxf apache-tomcat-8.5.50.tar.gz
[root@server08 pinpoint]# mv apache-tomcat-8.5.50 /usr/local/tomcat8.5
[root@server08 pinpoint]# cd /usr/local/tomcat8.5/
[root@server08 tomcat8.5]# ./bin/startup.sh
Using CATALINA_BASE:   /usr/local/tomcat8.5
Using CATALINA_HOME:   /usr/local/tomcat8.5
Using CATALINA_TMPDIR: /usr/local/tomcat8.5/temp
Using JRE_HOME:        /usr/local/jvm/jdk1.8/jre
Using CLASSPATH:       /usr/local/tomcat8.5/bin/bootstrap.jar:/usr/local/tomcat8.5/bin/tomcat-juli.jar
Tomcat started.
[root@server08 tomcat]# systemctl stop firewalld
[root@server08 tomcat]# systemctl disable firewalld
Removed symlink /etc/systemd/system/multi-user.target.wants/firewalld.service.
Removed symlink /etc/systemd/system/dbus-org.fedoraproject.FirewallD1.service.
[root@server08 tomcat8.5]# curl -I -m 10 -o /dev/null -s -w %{http_code}  10.211.55.143:8080
200[root@server08 tomcat8.5]#
解压客户端文件,并copy到指定目录下。
[root@server08 pinpoint]# mkdir /usr/local/pinpoint-agent
[root@server08 pinpoint]# cp pinpoint-agent-1.8.5.tar.gz /usr/local/pinpoint-agent/
[root@server08 pinpoint]# cd /usr/local/pinpoint-agent/
[root@server08 pinpoint-agent]# tar -zxf pinpoint-agent-1.8.5.tar.gz
配置tomcat,让tomcat启动时需要加载pinpoint-agent,这样才能收集到数据。
[root@server08 pinpoint]# cd/usr/local/tomcat8.5/bin
[root@server08 bin]# vim catalina.sh
CATALINA_OPTS="$CATALINA_OPTS -javaagent:/usr/local/pinpoint-agent/pinpoint-bootstrap-1.8.5.jar"
CATALINA_OPTS="$CATALINA_OPTS -Dpinpoint.agentId=server8"
CATALINA_OPTS="$CATALINA_OPTS -Dpinpoint.applicationName=server8"
[root@server08 bin]# systemctl stop firewalld
[root@server08 bin]# systemctl disable firewalld
Removed symlink /etc/systemd/system/multi-user.target.wants/firewalld.service.
Removed symlink /etc/systemd/system/dbus-org.fedoraproject.FirewallD1.service.
tomcat配置完成,但是数据没有发送到pinpoint server,忘记配置pinpoint agent了。
[root@server08 pinpoint]# cd /usr/local/pinpoint-agent/
[root@server08 pinpoint-agent]# vim pinpoint.config
...............................
profiler.collector.ip=10.211.55.142   #指定pinpoint server的ip
...............................
重启一下客户端的tomcat。这个时候我们看一下服务端是否增加了客户端。

新机器已经增加完成,不过这个时候客户端是没有数据的,为了能够采集到数据,下面我们相互之间访问一下,收集数据。
[root@server07 pinpoint]# cnt=0; while [ $cnt -lt 10000 ]; do curl http://server08:8080; let cnt++; done
[root@server08 ~]# cnt=0; while [ $cnt -lt 10000 ]; do curl http://server07:8080; let cnt++; done
这是一个循环任务,会一直循环访问,这里要注意,系统时间要统一,如果系统时间不统一有可能收到的数据会不显示。为了给搭建展示采集效果,我多加几个循环,让后台运行一下。
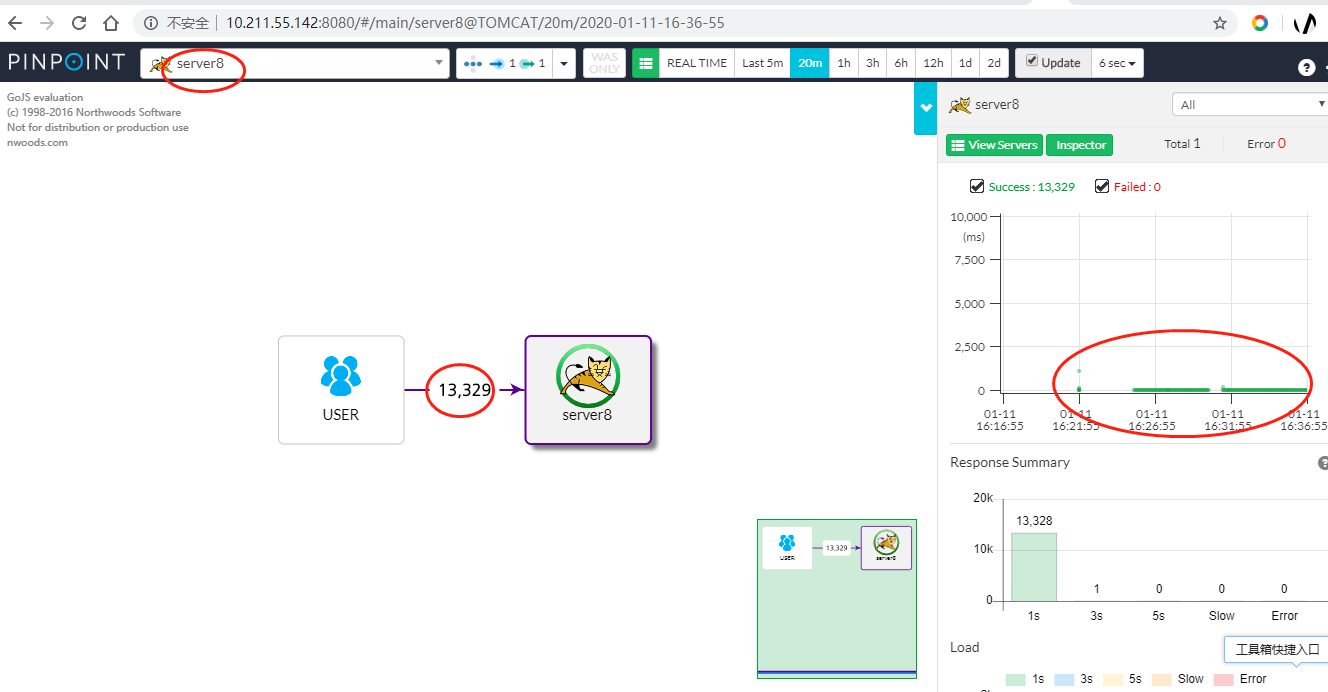
这个时候,两台机器都采集到了数据,因为我只有前端页面,没有访问存储服务,所以这里没有显示,到此pinpoint源码服务已经安装完成,下一章看一下pinpoint的基本使用吧。
您可以选择一种方式赞助本站
支付宝扫一扫赞助
微信钱包扫描赞助
赏